How to Measure Correctly for a Custom Cut-to-Size Mirror (Avoid Costly Mistakes)
Ordering a custom cut-to-size mirror is one of the smartest ways to achieve a clean, built-in, professional look in your home. But it also leaves zero room for error. A mirror that’s even a few millimetres too large—or awkwardly sized for its surroundings—can mean delays, extra costs, or a result that simply doesn’t look right.
This guide walks you through exactly how to measure for a custom mirror, step by step, so you can order with confidence and avoid the most common (and expensive) mistakes homeowners make.
Whether you’re fitting a bathroom mirror, a hallway feature, or a full-width gym mirror, the principles below apply.
Why Measuring for a Custom Mirror Is Different
Unlike standard mirrors, custom mirrors are cut specifically to your measurements. That means:
- No trimming or resizing later
- No “close enough” adjustments
- No returns if the size is wrong
Once the mirror is cut, the measurements must be right the first time.
This is why correct measuring is more important than choosing the mirror style itself.
Tools You’ll Need (Don’t Skip This)
Before you start, gather the right tools:
- Steel tape measure (not fabric)
- Pencil and notepad
- Spirit level (or phone level app)
- Masking tape (optional but very useful)
Avoid measuring with guesswork or memory. Always write measurements down.
Step 1: Measure the Actual Wall Space (Not What You Think It Is)
Walls are rarely as perfect as they look.
Measure in Three Places
For both width and height, measure:
- Top
- Middle
- Bottom
Walls can bow slightly, especially in older homes or tiled bathrooms.
👉 Always use the smallest measurement.
Example:
- Top width: 1002 mm
- Middle width: 1000 mm
- Bottom width: 998 mm
👉 Order 998 mm, not 1000 mm.
This alone prevents most fitting issues.
Step 2: Account for Clearance (This Is Where Many People Go Wrong)
A mirror that fits “exactly” edge-to-edge often doesn’t fit at all once installed.
Leave Clearance For:
- Wall unevenness
- Adhesive thickness
- Fixings or brackets
- Slight installation movement
Recommended clearance:
- Leave 3–5 mm total clearance on width and height for tight spaces
- For large mirrors, up to 10 mm total is safer
This tiny gap is visually invisible but makes installation stress-free.
Step 3: Measure Relative to Furniture (Not Just the Wall)
Mirrors don’t exist in isolation.
For Vanity or Console Mirrors
A good rule:
- Mirror width = ⅔ to ¾ the width of the furniture below
Too small looks lost.
Too large overwhelms the space.
If you’re unsure how mirror proportions affect a room, this guide explains it clearly:
Wall mirror sizes explained: avoid ordering the wrong one
Step 4: Check for Obstacles You Can’t Ignore
Before finalising measurements, look carefully for:
- Plug sockets
- Light switches
- Wall lights
- Extractor fans
- Tile trims or grout lines
- Sloped ceilings
Pro Tip
Use masking tape to mark the mirror outline on the wall.
This helps you visually confirm:
- Height feels right
- Lights aren’t blocked
- Reflections line up correctly
Step 5: Decide the Height Based on Eye Level
This matters more than people realise.
General Guideline
- Centre of mirror should sit roughly at average eye level (150–160 cm)
But adjust depending on:
- Whether the mirror is decorative or functional
- Who primarily uses it (children vs adults)
- Whether it’s above furniture
A mirror can be perfectly measured yet feel “wrong” if positioned too high or too low.
Step 6: Frameless vs Framed (Measure Differently)
Frameless Mirrors
- Measure exact visible glass size
- Include clearance as discussed earlier
Framed Mirrors
- Measure total outer frame size
- Confirm whether the frame overlaps the glass or adds depth
Many people accidentally order the glass size when they actually needed the framed size.
Step 7: Thickness Matters (Especially for Large Mirrors)
While thickness doesn’t change width or height, it affects safety and appearance.
Typical options:
- 4 mm – Small decorative mirrors
- 6 mm – Standard bathroom mirrors
- 8 mm+ – Large mirrors, gyms, commercial use
Thinner mirrors can flex or distort at larger sizes. Always match thickness to size and location.
Step 8: Bathrooms Require Extra Planning
Bathrooms are the most common place for measurement mistakes.
Consider:
- Steam and humidity
- Tile lines (mirror edges rarely align perfectly with grout)
- Wall lights casting shadows
- Cabinets opening clearance
If you’re installing above a vanity, the mirror should not clash with taps or splash backs.
Step 9: Full-Wall or Gym Mirrors (Measure as Sections)
For large mirror walls:
- Measure the total wall width
- Divide into multiple panels, not one huge mirror
- Allow consistent gaps between panels (2–3 mm)
This:
- Improves safety
- Simplifies installation
- Allows replacement of one panel if damaged
Never assume a single oversized mirror is the best solution.
Step 10: Write Measurements Clearly (Avoid Costly Mix-Ups)
When submitting measurements:
- Always specify width × height
- Use millimetres unless told otherwise
- Double-check orientation (portrait vs landscape)
Example:
1200 mm (W) × 800 mm (H)
Never assume the supplier will guess correctly.
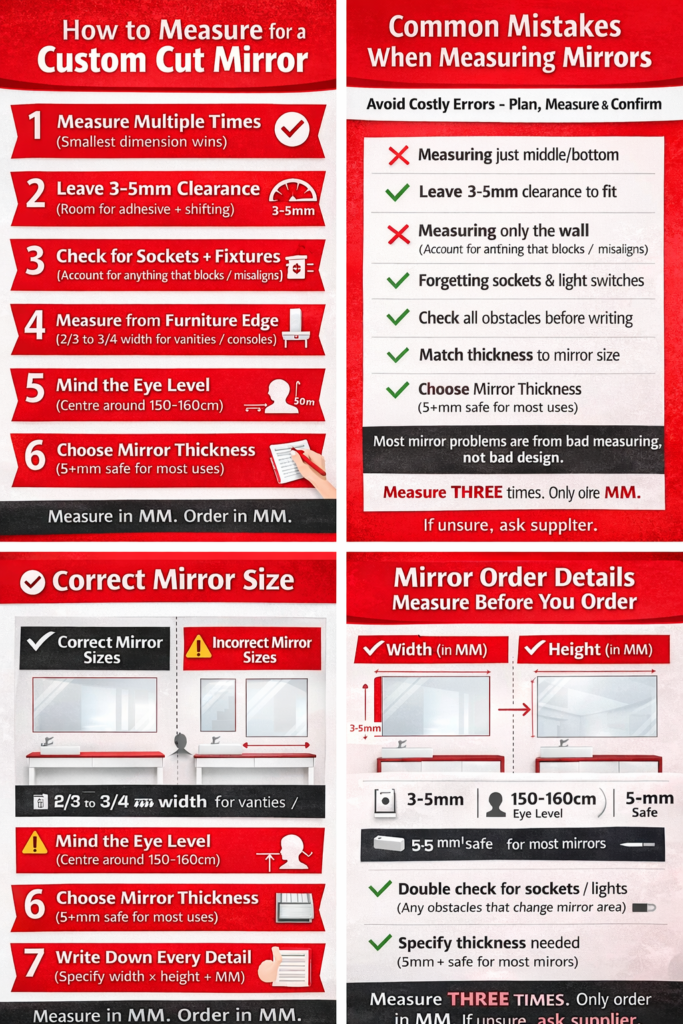
Most Common Measuring Mistakes (And How to Avoid Them)
❌ Measuring once
✔ Measure at least three times
❌ Ignoring clearance
✔ Always allow 3–10 mm total tolerance
❌ Measuring only the wall
✔ Measure relative to furniture and lighting
❌ Forgetting sockets and switches
✔ Tape out the mirror area first
❌ Guessing thickness
✔ Match thickness to mirror size and location
Final Checklist Before Ordering
Before placing your order, confirm:
- ✅ Smallest width and height used
- ✅ Clearance included
- ✅ Obstacles checked
- ✅ Furniture alignment considered
- ✅ Thickness selected correctly
- ✅ Orientation clearly stated
If every box is ticked, you’re ready.
Ordering with Confidence
When measured correctly, a custom mirror transforms a space—clean lines, perfect proportions, and a finish that looks professionally installed.
If you’re ready to order, explore Glass Help’s range of custom cut to size mirrors, available in multiple shapes, finishes, and sizes to suit bathrooms, hallways, gyms, and feature walls.
Key Takeaway
Most mirror problems aren’t design issues—they’re measurement issues.
Take your time, measure properly, and your custom mirror will fit perfectly the first time.