How to Choose the Right Glass Shelf Thickness (6mm, 8mm, 10mm Explained)
Glass shelves look lightweight and minimal — but they still need to behave like a structural component. Pick a thickness that’s too thin and you’ll get noticeable flex (sag) and higher break risk. Pick one that’s thicker than necessary and you may simply spend more than you need to.
This guide breaks down 6mm vs 8mm vs 10mm in a practical way, using the factors that matter most: span (distance between supports), expected load, shelf depth, fixing type, and safety glass choice. Glass Helper+1
Start here: the 3 things that decide thickness
Before choosing 6/8/10mm, answer these:
- Span (support-to-support distance)
This is the big one. The longer the span, the more the centre wants to bow under load. Glass Helper - Load (what you’ll actually put on it)
Light décor is very different from stacks of toiletries, jars, or books. Glass can often hold more than people expect — but only when properly supported and evenly loaded. Glass Helper - Support / fixing style
A shelf supported at both ends behaves differently than one on two small brackets or “floating” supports. Poor fixing choices are a common cause of shelf failures. Glass Helper
Safety first: choose toughened (tempered) glass where possible
For most home shelving, toughened (tempered) safety glass is the sensible option because it’s made for impact and safer break behaviour. Many UK suppliers provide shelves in BS EN 12150 toughened safety glass options. Glass Help Ltd+1
If you’re ordering custom shelves, you’ll typically be able to select:
- Glass type (clear, low-iron, tinted, frosted)
- Thicknesses (including 6mm, 8mm, 10mm)
- Edge finishing (polished edges look better and reduce chip risk during handling) Glass Help Ltd
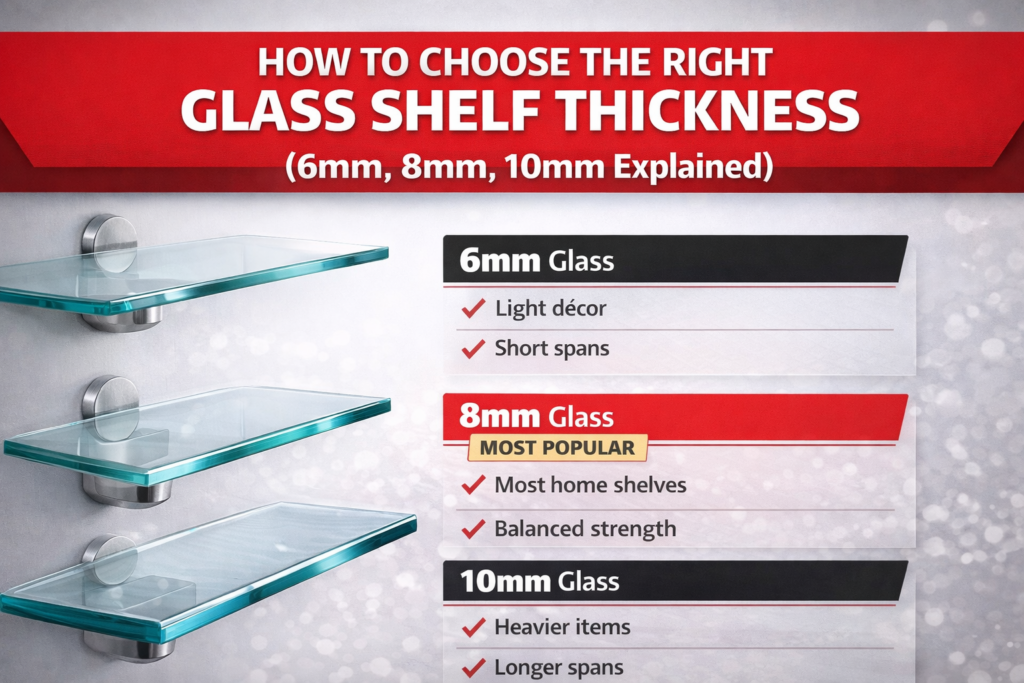
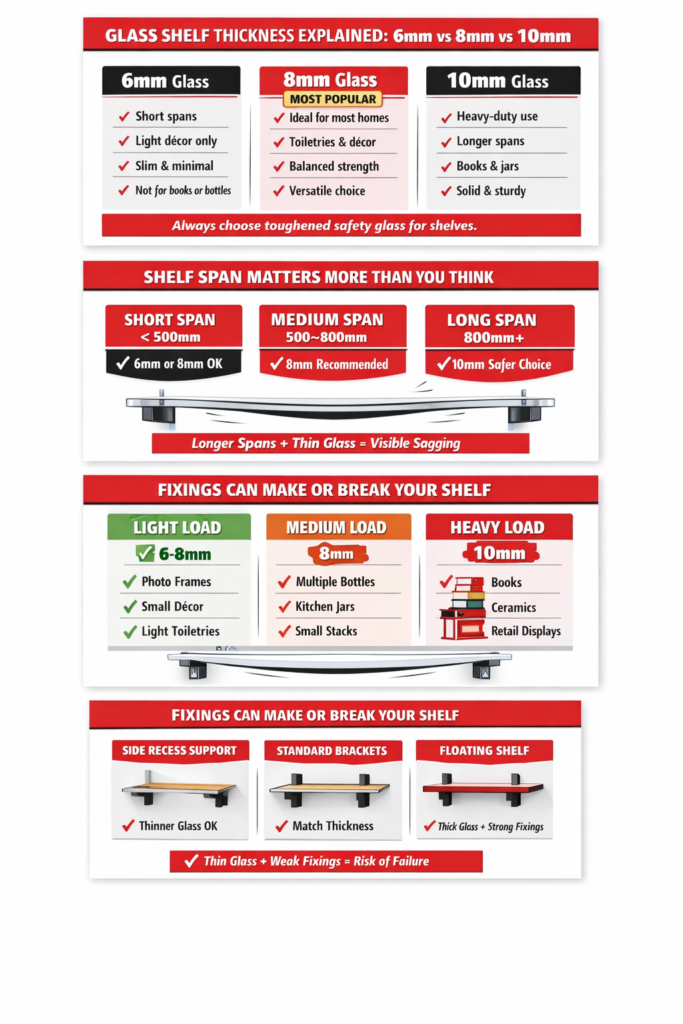
What 6mm, 8mm, and 10mm are best for

6mm glass shelves: best for light loads + short spans
Choose 6mm when:
- The shelf span is short (think small alcoves, narrow gaps, compact bathroom shelving)
- You’re placing lightweight items only (decor, small toiletries, lightweight display items)
- You want the slimmest look and the shelf is well-supported
Avoid 6mm if:
- The shelf is long (visible flex becomes likely)
- You’re storing anything “dense” (books, stacked products, bottles, kitchen jars)
- You’re using minimal brackets or a floating look with limited support Glass Helper+1
Real-world expectation:
6mm can be fine — but it’s the most unforgiving if span/support isn’t right. Many installation guides warn that thin glass can flex or bow under moderate weight. Glass Helper
8mm glass shelves: the best all-rounder for most homes
If you’re unsure, 8mm is usually the safest “default” for everyday residential shelves.
Choose 8mm when:
- You want a shelf that feels solid under normal household use
- It will hold toiletries, small appliances, framed photos, small stacks of items
- The span is moderate and supported correctly
Many practical thickness guides describe 8mm as the “general household” choice — strong enough for daily use without looking bulky. Glass Helper+1
10mm glass shelves: for heavier loads, longer spans, or premium feel
Go for 10mm when you want noticeably less flex and a more “premium, sturdy” feel.
Choose 10mm when:
- You’re storing heavier items (books, larger bottles, kitchen storage, display stock)
- The shelf span is on the longer side
- You want higher confidence with fewer supports (still needs correct hardware)
Weight-capacity guidance commonly shows a clear jump from 8mm to 10mm in practical loading situations (assuming proper support and even loading). Glass Helper
Quick thickness selector (simple, practical)
Use this as a rule-of-thumb starting point:
- 6mm: short spans + light décor
- 8mm: most bathroom / kitchen / living room shelves
- 10mm: heavier items, longer spans, or “no flex” preference Glass Helper+1
If you’re between two options, it’s usually smarter to go one thickness up to reduce flex and improve long-term reliability. Glass Helper
Span matters: why thickness changes everything
Even good glass will flex if it’s too thin for the span. Thickness impacts stiffness strongly — so small increases in thickness can make a shelf feel dramatically more rigid in the middle. Glass Helper+1
Practical examples (general guidance):
- Short shelf between strong side supports → 6–8mm can work well
- Medium span with standard brackets → 8–10mm is typical
- Longer span (especially with only 2 brackets) → 10mm+ is often the safer call Glass Helper+1
Load matters: what are you putting on the shelf?
Here’s a simple way to think about “load”:
Light load (often OK with 6–8mm)
- Small décor, lightweight ornaments
- Small toiletries (few items)
- Light display products
Medium load (usually 8–10mm)
- Multiple toiletries bottles lined up
- Kitchen spices/jars (not overly dense)
- A few books (not full rows)
- Medium display stock
Heavy load (usually 10mm, sometimes thicker)
- Books across the full width
- Stacked jars/containers
- Larger bottles, ceramics, dense items
- Retail displays with frequent use
Also remember: uneven loading (heavy items clustered in the middle) increases stress and flex. Many shelf failures are caused by overloading or poor weight distribution. Glass Helper+1
Support type: the hidden factor people forget
Thickness alone can’t “fix” bad mounting.
Common support styles:
- Side supports / recess supports (best support for thinner glass)
- Standard brackets (good when properly spaced and anchored)
- Floating supports (can be safe, but demands correct rated hardware and careful installation)
Installation guides repeatedly highlight mistakes like:
- wrong wall fixings
- poor bracket alignment
- choosing incorrect thickness for the span
- overloading the shelf Glass Helper
If you want a “floating” look:
You often need either thicker glass or more robust rated fixings — sometimes both.
Shelf depth: deeper shelves need more stiffness
A deeper shelf (front-to-back) can behave like a longer “lever” under load, especially when weight sits toward the front edge. If you’re doing deeper shelves for storage or display, consider moving from 6mm → 8mm, or 8mm → 10mm for the same span.
Bathrooms, kitchens, and kids: choosing thickness by room
Bathroom shelves
- Usually short spans, but humidity and frequent use matter
- 8mm is a safe everyday choice for bottles and toiletries
- 6mm can work for small shelves with light items and strong supports Glass Helper+1
Kitchen shelves
- Loads can get heavy quickly (jars, appliances, plates)
- 10mm is often the safer pick for real storage shelves
Living rooms / display
- For décor: 6–8mm depending on span
- For books/collectibles: 8–10mm depending on span and bracket spacing Glass Helper+1
Ordering checklist (use this before you buy)
Before you order, make sure you’ve covered:
- Span: measure exact distance between supports
- Depth: how deep is the shelf?
- Load: what will you place, realistically, in 3–6 months?
- Glass type: prefer toughened safety glass for most household shelving Glass Helper+1
- Edge finish: polished edges look better and help reduce chip risk during handling Glass Help Ltd
- Fixings: choose hardware rated for the thickness and load, and anchor properly Glass Helper
Where to order (and 2 helpful guides)
If you’re ordering made-to-measure shelves, here’s the product page to start your custom order with a natural reference:
- Order made-to-measure glass shelves here: Glass Shelves (custom-cut, multiple thickness options) — https://www.glasshelp.co.uk/glass-shelves/ Glass Help Ltd
And if you want deeper guidance for “real life” decisions:
- Weight guidance (useful for matching thickness to what you’ll store): https://www.glasshelper.co.uk/how-much-weight-can-a-glass-shelf-hold-real-limits-explained/ Glass Helper
- Installation pitfalls to avoid (hardware + mounting mistakes that cause cracks or failures): https://www.glasshelper.co.uk/top-10-mistakes-to-avoid-when-installing-glass-shelves-at-home/ Glass Helper
Final recommendation (simple)
- Choose 6mm for small, light-use shelves with strong support.
- Choose 8mm for most homes (bathrooms, general shelving, typical use).
- Choose 10mm when the shelf is longer, deeper, or will carry heavier items — or you just want minimal flex and a premium feel.