Mirrors

Mirrors

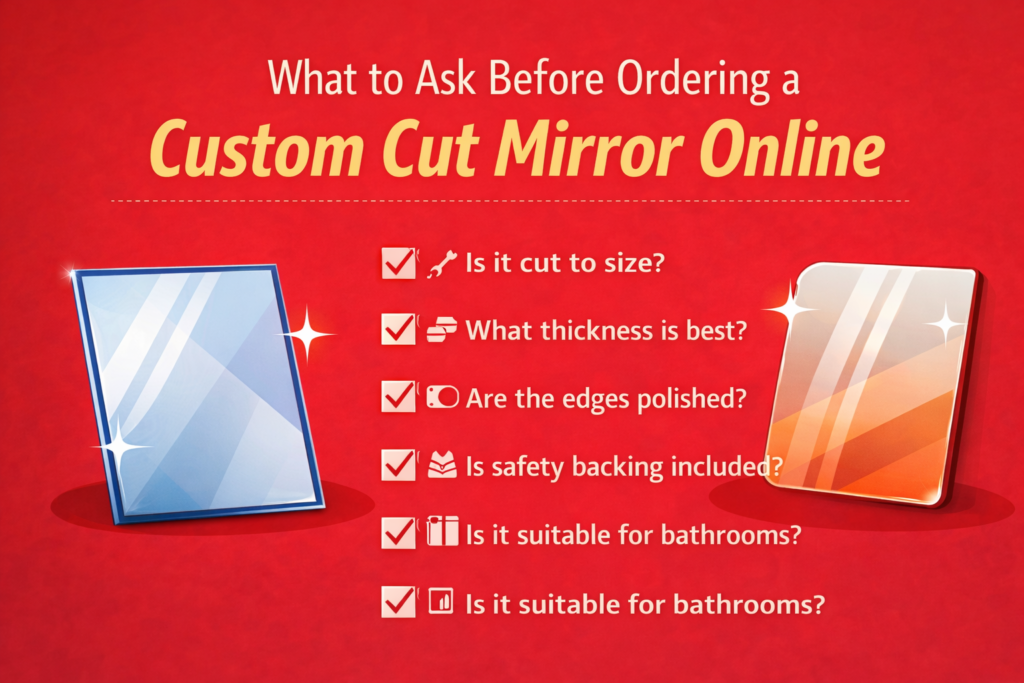
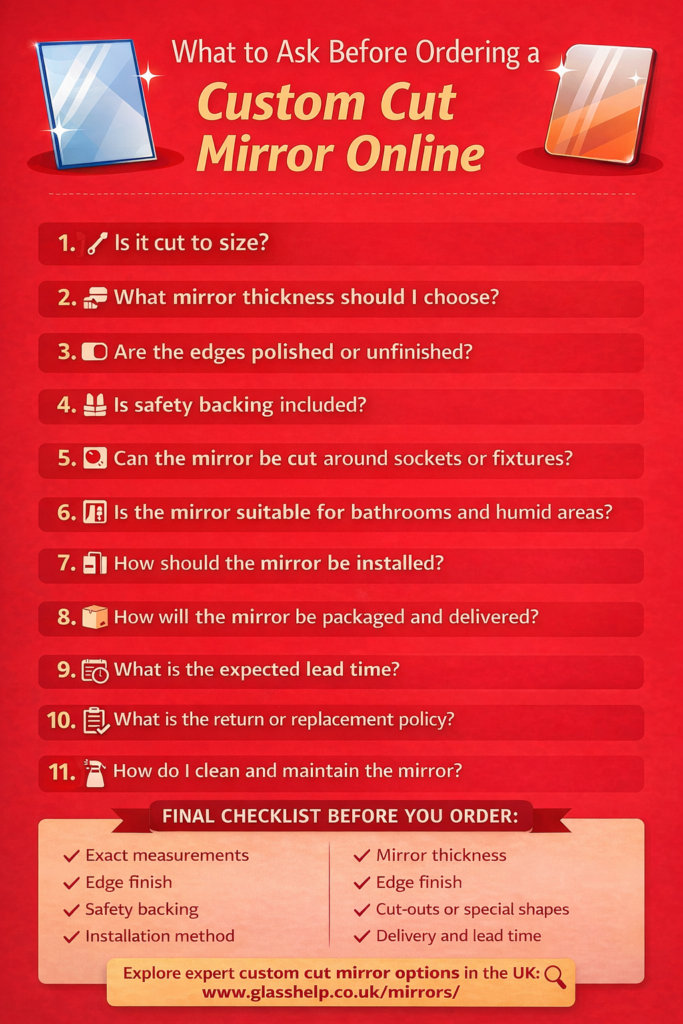
How to Order a Custom Mirror Online: Step-by-Step Guide

Dec 26, 2025

Ordering a custom mirror online is easier than ever — but only if you follow the right process. Whether you’re buying a mirror for a bathroom, bedroom, gym, wardrobe, or feature wall, small mistakes in measurement, thickness choice, or installation planning can lead to costly problems later.

This step-by-step guide walks you through exactly how to order a custom cut mirror online, from planning and measuring to delivery and installation — so you get a mirror that fits perfectly, looks professional, and lasts for years.


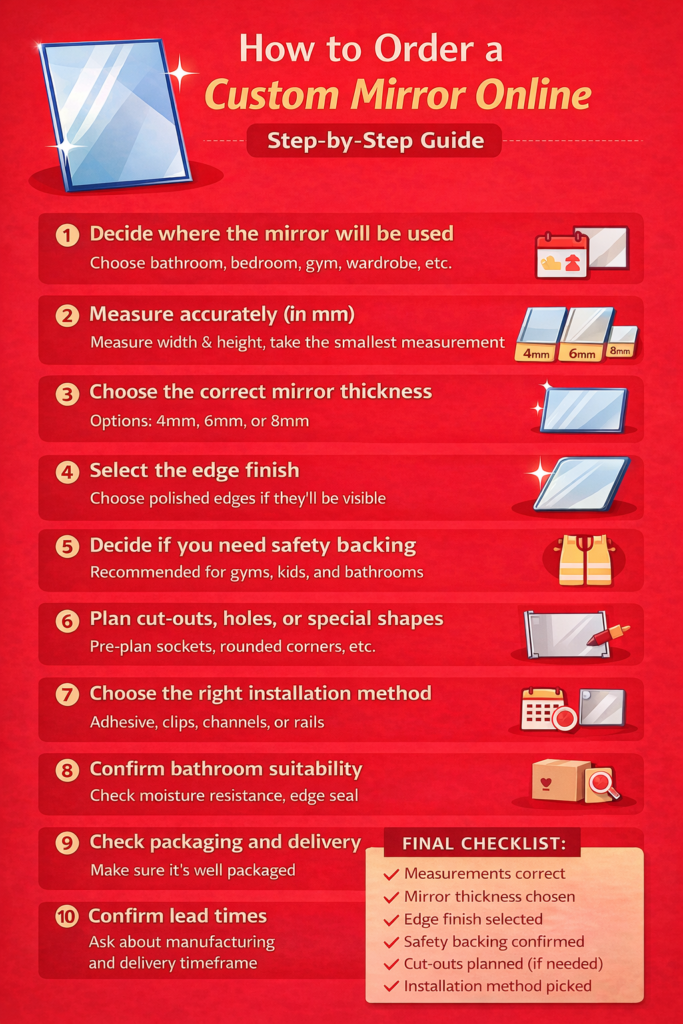
Step 1: Decide where the mirror will be used

Before measuring or choosing finishes, be clear about where and how the mirror will be used.

Ask yourself:

  • Is this for a bathroom, bedroom, gym, hallway, or furniture?
  • Will the mirror be exposed to moisture or steam?
  • Will it be installed wall-to-wall, inside an alcove, or as a standalone piece?
  • Will the edges be visible or hidden by a frame?

Why this matters:
The location affects thickness, safety backing, edge finish, and installation method. A bathroom mirror has different requirements than a gym or wardrobe mirror.


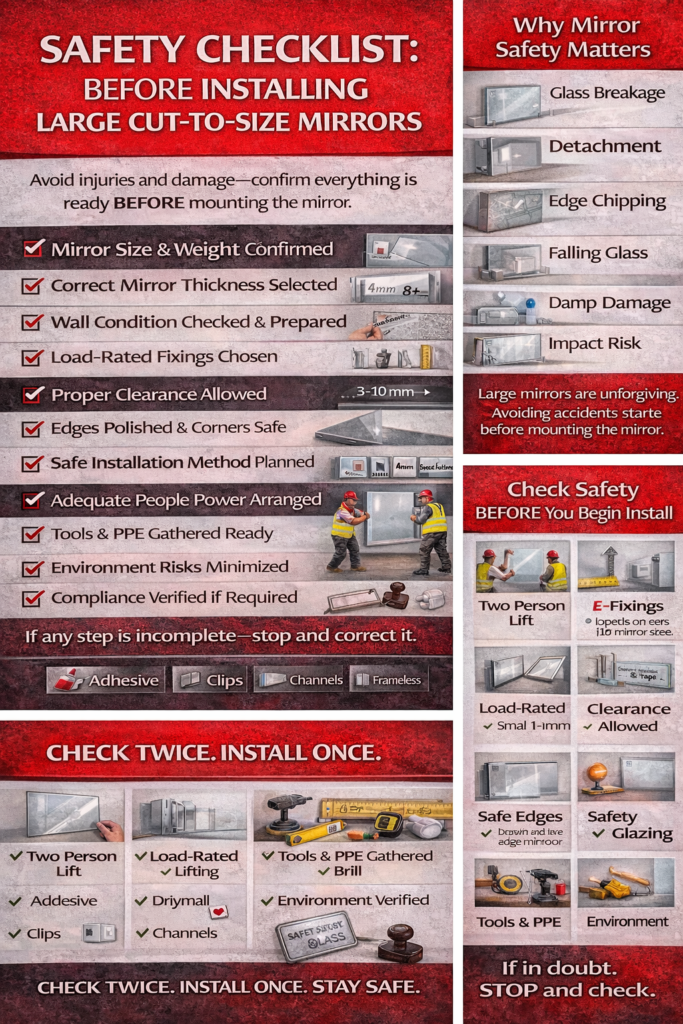
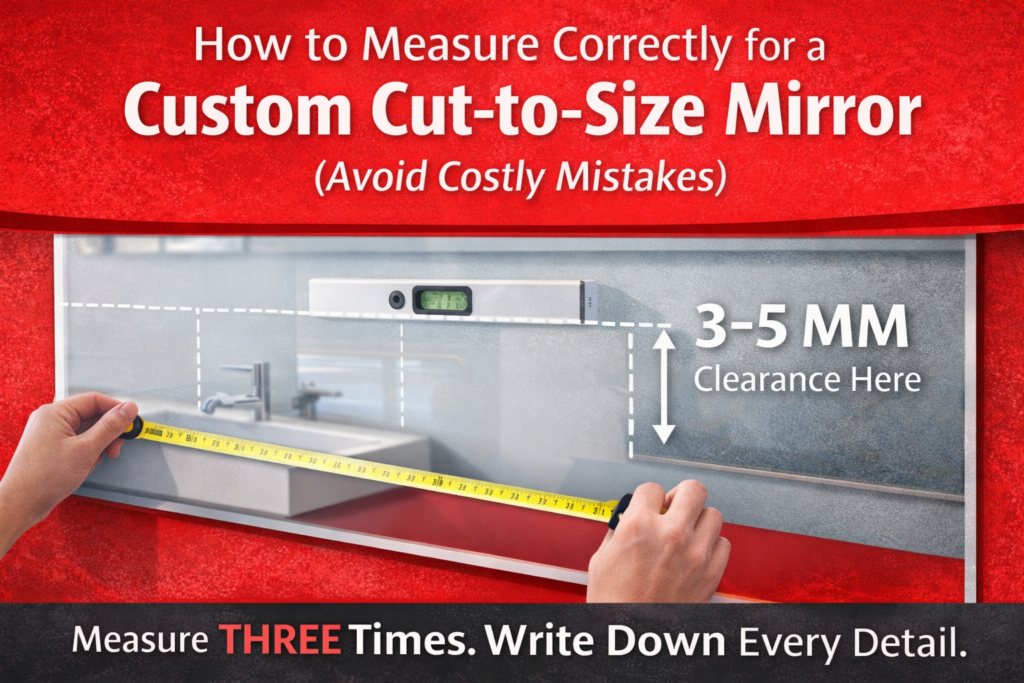
Step 2: Measure accurately (this is critical)

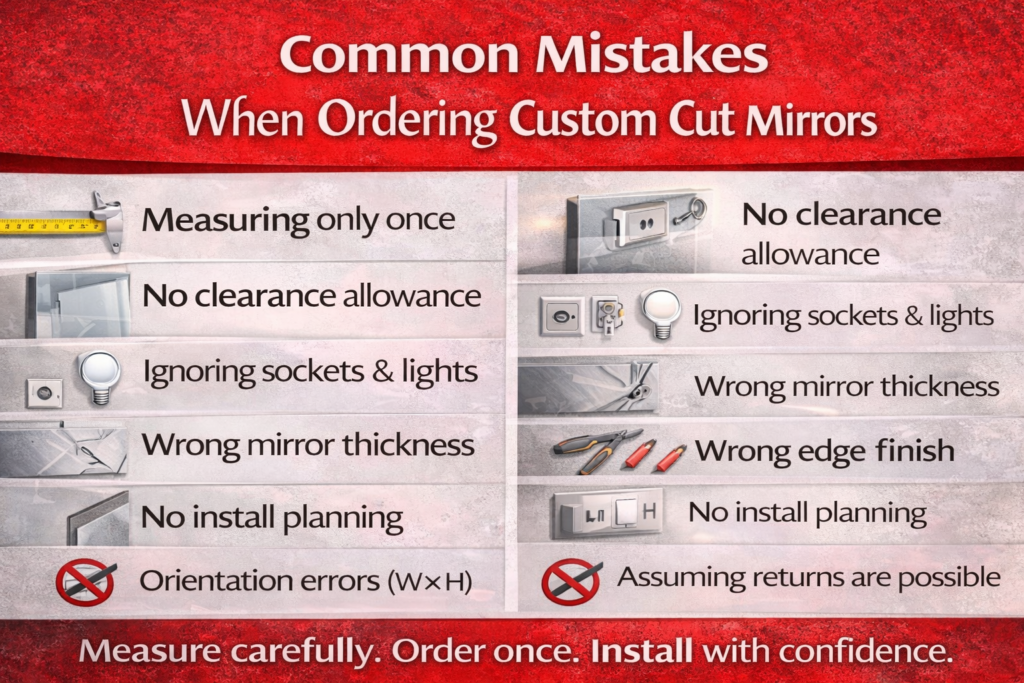
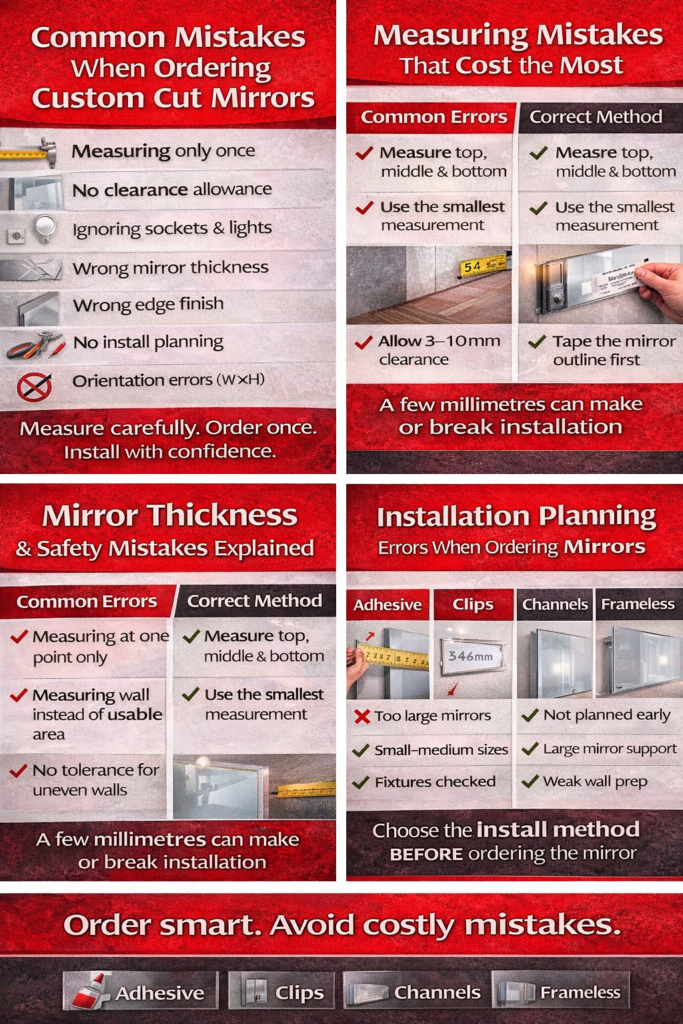
Incorrect measurements are the number one cause of custom mirror issues.

How to measure properly:

  • Measure width and height in millimetres
  • Take measurements in at least three places (top, middle, bottom)
  • Use the smallest measurement to avoid tight fitting
  • Account for tiles, skirting, uneven walls, and gaps

Important tips:

  • Do not round up measurements
  • Allow a small clearance if fitting wall-to-wall
  • Measure after tiling, not before

Why this matters:
Custom mirrors are made to order. Even a 2–3mm error can cause fitting issues that cannot be fixed after delivery.


Step 3: Choose the correct mirror thickness

Mirror thickness affects strength, stability, weight, and reflection quality.

Common thickness options:

  • 4mm – Suitable for small mirrors or framed installations
  • 6mm – Most popular choice for bathrooms and wall mirrors
  • 8mm – Ideal for large mirrors, gyms, and feature walls

Ask yourself:

  • Is the mirror large or small?
  • Will it be frameless?
  • Will it be installed in a high-traffic area?

Why this matters:
Larger mirrors benefit from thicker glass, which stays flatter and reduces distortion.


Step 4: Select the edge finish

If your mirror edges will be visible, edge finishing is essential.

Common edge finishes:

  • Polished edges – Smooth, shiny, and safe (most popular)
  • Seamed edges – Lightly smoothed, not decorative
  • Unfinished edges – Only suitable if fully hidden in a frame

Why this matters:
Unfinished edges are sharp and unsafe if exposed. Polished edges give a clean, professional look.


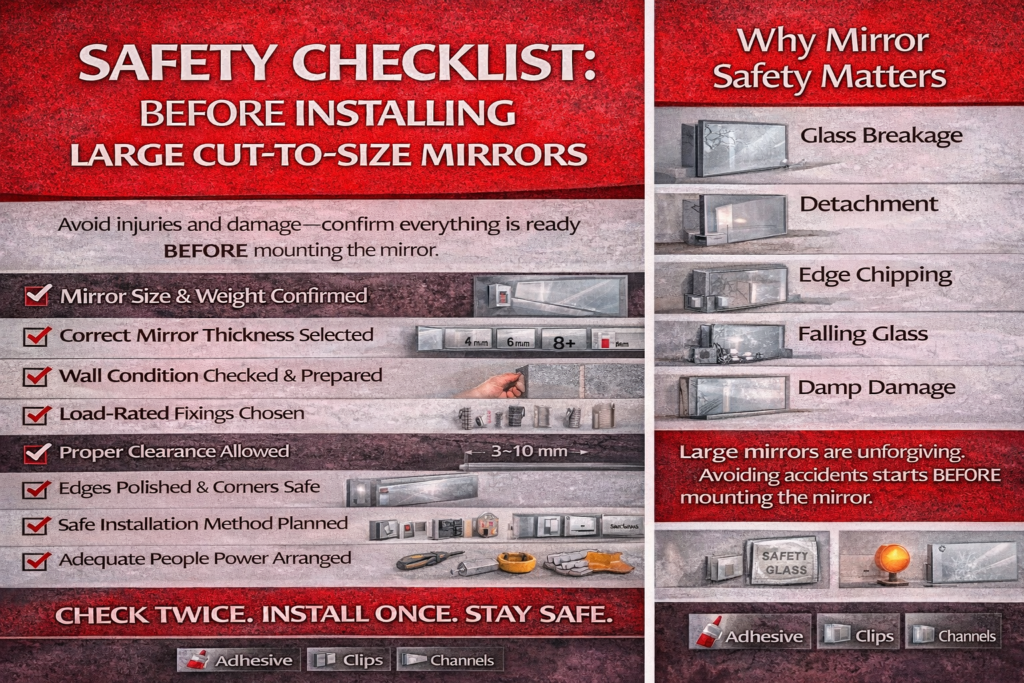
Step 5: Decide if you need safety backing

Safety backing is a protective film applied to the back of the mirror.

Safety backing is strongly recommended for:

  • Gyms and studios
  • Family homes
  • Bathrooms
  • Large wall mirrors

Why this matters:
If the mirror breaks, safety backing helps hold the glass together, reducing injury risk.


Step 6: Plan cut-outs, holes, or special shapes (if needed)

Many mirrors require custom shaping.

Consider if you need:

  • Cut-outs for sockets or switches
  • Holes for fixings
  • Rounded corners
  • Notches for furniture or pipes

Important:
All cut-outs must be planned before ordering. Mirrors cannot be modified after manufacturing.


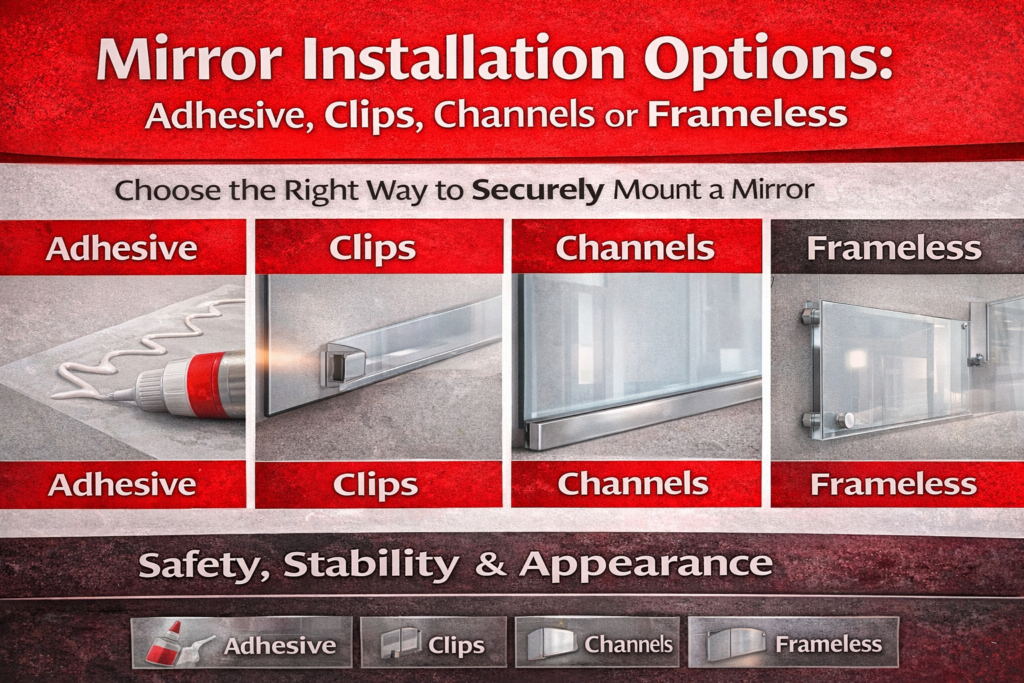
Step 7: Choose the right installation method

How you plan to install the mirror affects thickness and safety choices.

Common installation options:

  • Mirror adhesive – Clean, frameless look
  • Clips or brackets – Visible fixings, easier removal
  • Channels or rails – Secure for larger mirrors

Ask:

  • Is professional installation recommended?
  • What adhesive or fixings are suitable?
  • Does wall type matter (plasterboard, brick, tile)?

Why this matters:
Incorrect installation can cause stress cracks, distortion, or failure over time.


Step 8: Confirm bathroom suitability (if applicable)

Bathrooms expose mirrors to steam and moisture.

Before ordering, confirm:

  • The mirror is suitable for humid environments
  • Edges are properly sealed
  • Cleaning guidelines are provided

Why this matters:
Poor edge protection can cause black spots or corrosion on the mirror backing over time.


Step 9: Check packaging and delivery details

Mirrors are fragile and must be packaged correctly.

Ask the supplier:

  • How is the mirror packaged?
  • Is delivery insured?
  • What should I do if the mirror arrives damaged?

Why this matters:
Good packaging reduces breakage risk and ensures replacements are handled smoothly if needed.


Step 10: Confirm lead times

Custom mirrors are made to order.

Check:

  • Manufacturing time
  • Delivery timeframe
  • Any seasonal delays

Why this matters:
If the mirror is part of a renovation, delays can impact your entire project schedule.


Step 11: Understand the return and replacement policy

Custom mirrors are often non-returnable unless faulty.

Before ordering:

  • Confirm replacement policy for damage
  • Understand responsibility for measurement errors
  • Check inspection time on delivery

Why this matters:
Knowing the policy protects you if something goes wrong.


Step 12: Prepare for delivery day

When your mirror arrives:

  • Inspect packaging before signing
  • Check for cracks, chips, or damage
  • Report issues immediately

Do not install a damaged mirror — contact the supplier first.


Final checklist before ordering

Before placing your order, confirm:

  • ✔ Exact measurements
  • ✔ Correct thickness
  • ✔ Polished edge finish
  • ✔ Safety backing (if required)
  • ✔ Cut-outs and shapes confirmed
  • ✔ Installation method planned
  • ✔ Delivery and lead time checked

Final thoughts

Ordering a custom mirror online doesn’t have to be risky. By following these steps and confirming the right details upfront, you’ll avoid common mistakes and get a mirror that fits perfectly, looks professional, and lasts for years.

If you’re looking for professionally made, made-to-measure options, explore custom cut mirrors online here:
👉 https://www.glasshelp.co.uk/mirrors/

Mirrors

What to Ask Before Ordering a Custom Cut Mirror Online

Dec 26, 2025

Ordering a custom cut mirror online is one of the easiest ways to upgrade a bathroom, bedroom, gym, or feature wall. But many people only realise what they should have asked after the mirror arrives — when it doesn’t fit properly, the edges aren’t finished as expected, or installation becomes more complicated than planned.

This guide covers the essential questions you should ask before ordering a made-to-measure mirror online, helping you avoid costly mistakes and ensuring your mirror looks great and lasts for years.


1. Is the mirror truly cut to size?

Not all “custom” mirrors are fully bespoke. Some sellers offer standard sizes with slight adjustments rather than true made-to-measure cutting.

Ask before ordering:

  • Are mirrors cut exactly to my measurements (to the millimetre)?
  • Is there a size tolerance I should be aware of?
  • Do I need to allow clearance for tiles, walls, or fittings?

Why this matters:
Even a few millimetres can make the difference between a seamless fit and visible gaps — especially in alcoves, wardrobes, or wall-to-wall mirror installations.


2. What mirror thickness should I choose?

Mirror thickness affects stability, weight, reflection quality, and long-term durability.

Common thickness options:

  • 4mm – Suitable for small mirrors or framed use
  • 6mm – Ideal for most bathrooms and wall mirrors
  • 8mm – Best for large mirrors, gyms, and feature walls

Ask:

  • What thickness do you recommend for my mirror size?
  • Will a thinner mirror flex or distort?
  • Does thickness affect mounting or adhesive choice?

Why this matters:
Larger mirrors benefit from thicker glass, which stays flatter and feels more premium once installed.


3. Are the edges polished or unfinished?

Mirror edges are often overlooked — but they affect both safety and appearance.

Ask:

  • Are the edges polished, seamed, or raw?
  • Are polished edges included in the price?
  • Are the edges safe for exposed installations?

Why this matters:
If the mirror edges will be visible (frameless mirrors, feature walls, gyms), polished edges are essential for a clean, professional finish and safe handling.


4. Is safety backing included?

Safety backing is a protective film applied to the back of the mirror to reduce injury risk if it breaks.

Ask:

  • Does the mirror include safety backing?
  • Is it recommended for my installation type?
  • Is safety backing required for gyms or commercial spaces?

Why this matters:
In the event of breakage, safety backing helps keep glass fragments together — particularly important in bathrooms, gyms, and family homes.


5. Can the mirror be cut around sockets or fixtures?

Many walls include obstacles that need precise cut-outs.

Ask:

  • Can you cut holes for sockets, switches, or taps?
  • Do you offer corner radius or notched cut-outs?
  • What measurements or diagrams do you need?

Why this matters:
Trying to modify a mirror after delivery is risky and often impossible. All cut-outs must be planned before manufacturing.


6. Is the mirror suitable for bathrooms and humid areas?

Bathrooms expose mirrors to moisture, steam, and temperature changes.

Ask:

  • Is the mirror suitable for bathroom use?
  • How are the edges protected against moisture?
  • Will humidity affect the backing over time?

Why this matters:
Poor edge protection can lead to black spots or mirror corrosion, especially in poorly ventilated bathrooms.


7. How should the mirror be installed?

Installation requirements vary depending on mirror size and weight.

Ask:

  • Should the mirror be installed with adhesive, clips, or channels?
  • Is professional installation recommended?
  • Do you provide installation guidance?

Why this matters:
Incorrect installation can cause stress points, distortion, or even mirror failure over time.


8. How will the mirror be packaged and delivered?

Mirrors are fragile and require careful handling during transport.

Ask:

  • How is the mirror packaged?
  • Is delivery insured?
  • What should I do if the mirror arrives damaged?

Why this matters:
Proper packaging and clear delivery procedures reduce the risk of breakage and make replacements easier if something goes wrong.


9. What is the expected lead time?

Custom mirrors are made to order and cannot be shipped immediately.

Ask:

  • How long does manufacturing take?
  • Does delivery time vary by size or finish?
  • Will I be notified when the mirror ships?

Why this matters:
If your mirror is part of a renovation or tight schedule, lead time can affect your entire project timeline.


10. What is the return or replacement policy?

Custom mirrors are often non-returnable unless faulty.

Ask:

  • What happens if the mirror arrives damaged?
  • What if measurements are incorrect?
  • Do you offer replacements or refunds?

Why this matters:
Understanding the policy protects you in case of manufacturing defects or transport damage.


11. How do I clean and maintain the mirror?

Improper cleaning can shorten a mirror’s lifespan.

Ask:

  • What cleaning products should I use?
  • Are there products I should avoid?
  • How do I prevent edge damage over time?

Why this matters:
Using the wrong cleaners or soaking the edges can cause long-term damage, especially in bathrooms.


Final checklist before you order

Before placing your order, double-check that you’ve confirmed:

  • Exact measurements
  • Mirror thickness
  • Edge finish
  • Safety backing
  • Cut-outs or special shapes
  • Installation method
  • Delivery and lead time
  • Replacement policy

If you want a clean, long-lasting result, choosing a reputable supplier that offers made-to-measure mirrors and clear guidance makes all the difference. You can explore professional custom cut mirror options here:
👉 https://www.glasshelp.co.uk/mirrors/

Comparison

Custom Cut Mirrors vs Acrylic Mirrors: Pros, Cons & Lifespan

Dec 26, 2025

Custom cut mirrors and acrylic mirrors can both look great on day one — but they behave very differently over time. If you’re deciding between the two for a bathroom, gym, wardrobe, retail space, or a DIY feature wall, the “best” option depends less on looks and more on where it will be installed, how it will be cleaned, and what kind of wear it will face.

This guide breaks down the real-world pros, cons, typical lifespan, and the situations where each mirror type makes the most sense — so you can choose once and avoid regret later.


Quick definition: what are these mirrors, really?

Custom cut glass mirrors (made-to-measure)

A custom cut mirror is a real glass mirror cut to your exact dimensions (often with options like polished edges, safety backing, cut-outs, or corner radius). Because it’s glass, it delivers the best reflection quality and stays stable over many years when installed correctly.

If you want a made-to-measure option with a premium finish, explore custom cut mirrors made to your exact size for bathrooms, gyms, bedrooms and feature walls.

Acrylic mirrors

An acrylic mirror is a plastic mirror sheet (commonly acrylic/PMMA) with a reflective coating. It’s lightweight and far more impact-resistant than glass, which is why it’s popular for kids’ areas, portable setups, and certain gym or studio applications. The trade-off is that acrylic scratches more easily and can show distortion, especially on larger panels or uneven walls.


At-a-glance comparison table

Feature Custom Cut Glass Mirror Acrylic Mirror
Reflection quality Excellent clarity, minimal distortion Good on small panels; can distort on larger sheets
Scratch resistance Better resistance; still needs proper cleaning Scratches easily; requires gentle care
Impact safety Can break if impacted; safety backing helps Much more shatter-resistant; safer for high-contact zones
Weight Heavier; needs proper fixings/wall support Very lightweight; easier handling and mounting
Moisture & bathrooms Very good if edges are protected and installed correctly Can be fine, but needs careful sealing/adhesive choice
Long-term stability High stability; stays flat and true May warp slightly with heat/uneven mounting
Best use-cases Bathrooms, feature walls, wardrobes, premium interiors Kids areas, portable mirrors, impact-prone spaces

Pros and cons (the real-life version)

Custom cut glass mirrors — pros

  • Best reflection quality: crisp, true reflection that makes rooms look bigger and brighter.
  • Long-lasting finish: glass resists everyday micro-scratches far better than acrylic when cleaned correctly.
  • Premium look: polished edges, clean lines, and a solid “architectural” feel.
  • Stays flat: once installed on a properly prepared wall, it doesn’t flex or ripple.
  • Custom options: cut-outs, sockets, corner radius, bevels, edge finishes, safety backing, etc.

Custom cut glass mirrors — cons

  • Heavier: needs correct fixings and a wall that can support the load.
  • Break risk: impact can crack or shatter (safety backing reduces risk of shards spreading).
  • Installation must be right: uneven walls, wrong adhesive, or rushed mounting can cause stress points.

Acrylic mirrors — pros

  • Lightweight: easier to transport, lift, and fit — especially on large panels.
  • Shatter-resistant: a strong choice for spaces where impacts are likely (kids, busy studios, some gyms).
  • Flexible for certain setups: can work in temporary installations or where weight is the main issue.
  • Often lower upfront cost: particularly for small-to-medium DIY applications.

Acrylic mirrors — cons

  • Scratch-prone: even paper towels and the wrong cloth can leave swirls over time.
  • Can distort: larger sheets may show “funhouse” effects if the wall isn’t perfectly flat or the sheet isn’t mounted evenly.
  • Heat and expansion: acrylic can expand/contract more than glass; poor mounting can lead to subtle warping.
  • Cleaning is less forgiving: you must use gentle, acrylic-safe methods to keep it looking new.

Which lasts longer? A realistic lifespan breakdown

Important: lifespan isn’t only about the material — it’s also about the environment (bathroom humidity, direct sunlight, temperature swings), cleaning habits, and installation quality.

Typical lifespan: custom cut glass mirrors

  • Indoors, normal residential use: often 10–20+ years with correct installation and sensible cleaning.
  • Bathrooms: longevity depends heavily on ventilation and edge protection. Persistent moisture and poor edge sealing can cause “black edge” corrosion over time.
  • High-traffic commercial spaces: still long-lasting, but the risk is mainly impact damage rather than wear.

Typical lifespan: acrylic mirrors

  • Low-contact areas (decor panels, careful cleaning): commonly 3–8 years before visible swirls/scratches become noticeable.
  • Gyms/studios with frequent cleaning: can look tired sooner if wiped daily with the wrong products.
  • Kids rooms / high-touch zones: may need replacement earlier due to scratches and scuffs.

The key takeaway: If you want a “fit it once and forget it” mirror that stays crisp for years, glass usually wins. If safety and weight matter most — and you’re okay with extra care and possible replacement later — acrylic can be the smarter trade.


Clarity and distortion: why acrylic sometimes looks “wavy”

Many people love acrylic mirrors until they stand at an angle or step back and notice subtle distortion. This doesn’t always mean the acrylic is “bad quality.” Common causes include:

  • Wall unevenness: acrylic follows the wall’s shape more than glass does.
  • Mounting method: spot adhesive blobs, uneven tape pressure, or unsupported sections create ripples.
  • Panel size: the larger the sheet, the harder it is to keep perfectly flat.

Pro tip: If you’re set on acrylic, prioritize proper backing support and a perfectly flat substrate. For large wall panels where reflection quality really matters (dressing areas, salons, feature walls), glass is typically the safer bet visually.


Safety: which is safer in a home or gym?

Safety depends on risk type:

  • Impact risk (contact, falls, equipment knocks): acrylic is generally safer because it’s far less likely to shatter.
  • Cut risk from edges: both materials should have safe edge finishing and correct mounting. Glass can be ordered with polished edges; acrylic edges should be finished to remove sharpness.
  • Large glass panels: consider safety backing and correct fixings. Safety-backed glass helps hold fragments together if damaged.

If you’re choosing mirrors for gym-style environments, this read may help: Acrylic gym mirrors: everything you need to know.


Cleaning & maintenance: how to keep each mirror looking new

Cleaning glass mirrors (custom cut)

  • Use a microfibre cloth for a streak-free finish.
  • Spray cleaner onto the cloth (not the mirror) to reduce edge seepage.
  • Avoid soaking the edges — edge moisture is a common cause of long-term backing corrosion.

Cleaning acrylic mirrors (must-do rules)

  • No abrasives: avoid scouring pads, rough cloths, and paper towels.
  • No harsh chemicals: avoid strong solvents or aggressive cleaners that can damage the reflective backing.
  • Use mild soap + water and a clean microfibre cloth, then gently blot dry.

Thickness, weight, and “feel”: why this matters for custom cut mirrors

With glass mirrors, thickness affects rigidity, handling, and overall quality feel — especially for larger panels. If you’re deciding what thickness you need, this guide is useful: Mirror thickness guide (4mm vs 6mm vs 8mm).

In simple terms: thinner glass can be fine for small mirrors, but as mirrors get larger, extra thickness improves stability and reduces the chance of flexing or visual distortion.


Best use-cases: which one should you choose?

Choose a custom cut glass mirror if you want:

  • The clearest reflection (bedroom dressing areas, salons, feature walls)
  • Long-term durability without scratching easily
  • A premium built-in look (wardrobes, alcoves, wall panels)
  • Bathroom reliability (when installed correctly with good ventilation)

Choose an acrylic mirror if you need:

  • Lower weight for easier handling or lighter partition walls
  • Higher impact resistance (kids zones, certain gyms, portable setups)
  • A temporary or budget-led solution where replacement later is acceptable

A simple decision checklist (fast and practical)

  • If reflection quality is top priority: choose glass.
  • If safety from impacts is top priority: consider acrylic (or safety-backed glass if you still want clarity).
  • If it’s a humid bathroom: choose glass, install properly, and protect edges from constant moisture.
  • If it’s a high-touch, frequent-cleaning area: choose glass unless weight/safety rules it out.
  • If the wall is uneven: glass usually hides it better; acrylic can “telegraph” the bumps.

Final verdict

Custom cut glass mirrors are the best all-round choice for most homes and premium interiors: they look better, last longer, and stay clearer over time. Acrylic mirrors are a smart alternative when weight and impact safety are the main constraints — but they demand gentler cleaning and more realistic expectations about long-term appearance.

If you’re aiming for a clean, made-to-measure finish that will still look excellent years from now, start with made-to-measure custom cut mirrors and choose thickness/installation methods that match your space.

Mirrors

Safety Checklist Before Installing Large Cut-to-Size Mirrors

Dec 26, 2025

Large cut-to-size mirrors can transform a space—adding light, depth, and a clean, architectural look. But they also introduce real safety risks if installed incorrectly. Unlike small decorative mirrors, large mirrors are heavy, rigid, and unforgiving. A single mistake during installation can lead to glass failure, wall damage, or serious injury.

This safety checklist walks you through everything you should verify before installing a large custom mirror, whether it’s for a bathroom, home gym, hallway, or feature wall.

If you follow every step in this guide, you significantly reduce installation risks and ensure long-term stability.


Why Safety Matters with Large Mirrors

Large mirrors are not just oversized décor items—they are structural glass elements.

Key risks include:

  • Breakage due to uneven stress
  • Detachment from walls
  • Edge chipping or cracking
  • Injury from falling glass
  • Long-term degradation in damp environments

Industry guidance repeatedly highlights that mirror failures almost always stem from poor planning or incorrect fixing, not manufacturing defects.


1. Confirm the Mirror Size and Weight

Before anything else, understand exactly what you’re working with.

Checklist

  • Confirm final mirror dimensions (width × height)
  • Confirm thickness
  • Estimate total weight

As mirror size increases, weight increases rapidly. Even a modest-looking mirror can weigh far more than expected.

Safety Tip

Larger mirrors usually require mechanical support (clips, channels, or rails). Adhesive alone is rarely sufficient for large formats.


2. Choose the Correct Mirror Thickness

Thickness is a major safety factor.

General Guidance

  • 6 mm → Medium-sized bathroom mirrors
  • 8 mm or thicker → Large mirrors, gyms, feature walls

Thin mirrors are more prone to:

  • Flexing
  • Stress cracking
  • Uneven load distribution

Thicker mirrors sit flatter, feel more stable, and tolerate minor wall irregularities better.


3. Inspect the Wall Condition Carefully

Never assume a wall is suitable just because it “looks fine.”

Check for:

  • Uneven or bowed surfaces
  • Crumbling plaster or weak drywall
  • Moisture damage
  • Loose tiles
  • Hollow cavities

Why This Matters

Uneven walls create pressure points in the glass. Over time, this can lead to cracks—even if the mirror initially installs without issue.

Professional installation guidance consistently recommends correcting wall defects before mounting large mirrors.


4. Verify the Installation Method Matches the Mirror Size

Not all fixing methods are equal.

Safer Options for Large Mirrors

  • Bottom channel systems
  • Full rail systems
  • Mechanical clips with load distribution
  • Frameless floating systems (professionally installed)

High-Risk Choices

  • Adhesive-only mounting for heavy mirrors
  • Inadequate fixings into plasterboard
  • Fixings placed too close to mirror edges

According to This Old House, heavy mirrors should always have positive mechanical support, especially in bathrooms or high-traffic areas.

Authority reference:
👉 https://www.thisoldhouse.com/


5. Confirm Wall Fixings Are Load-Rated

Wall fixings must be appropriate for:

  • Mirror weight
  • Wall material (plasterboard, masonry, tile)
  • Installation method

Checklist

  • Use fixings rated for more than the mirror’s weight
  • Never rely on drywall anchors alone for heavy mirrors
  • Locate wall studs or solid masonry where possible

Insufficient fixings are one of the most common causes of mirror detachment.


6. Ensure Adequate Clearance & Tolerance

Large mirrors should never be forced into position.

Safe Tolerance

  • 3–5 mm total clearance for medium mirrors
  • Up to 10 mm for large mirrors or tiled walls

Why this matters:

  • Walls expand and contract slightly
  • Adhesives need space
  • Glass must not be under compression

A mirror installed under tension is a failure waiting to happen.


7. Check Edge Finish and Corner Safety

Edges are one of the most dangerous parts of a mirror.

Safety Checklist

  • Polished edges for all exposed sides
  • No sharp corners near traffic areas
  • Rounded corners for mirrors near doors or walkways

Unfinished edges increase both injury risk and glass failure risk.


8. Confirm Compliance with Safety Glazing Guidance (Where Relevant)

While mirrors are not always legally required to meet safety glass standards, impact-risk areas should follow safety guidance.

Examples include:

  • Gyms
  • Children’s areas
  • Low-mounted mirrors
  • High-traffic corridors

The British Standards Institution outlines impact-safety considerations under BS EN 12600, which is widely referenced in glazing safety contexts.

Authority reference:
👉 https://www.bsigroup.com/en-GB/standards/bs-en-12600/


9. Plan the Installation Process (Never Rush)

Large mirrors should never be installed alone or rushed.

Best Practice

  • Two or more people for lifting
  • Protective gloves and footwear
  • Clear working area
  • Temporary supports or spacers
  • Pre-marked fixing points

Accidents most often occur during lifting and alignment—not after installation.


10. Consider the Room Environment

Environmental factors affect long-term safety.

Bathroom & Damp Areas

  • Use moisture-resistant adhesive
  • Allow ventilation space where needed
  • Avoid trapping moisture behind the mirror

Gyms & Activity Areas

  • Prefer mechanical fixings or channels
  • Avoid adhesive-only mounting
  • Choose thicker mirrors

Humidity and temperature changes can weaken adhesive bonds over time.


11. Confirm You Can Remove or Replace the Mirror Safely (If Needed)

Future removal matters.

Questions to Ask

  • Will the mirror ever need replacing?
  • Is wall damage acceptable?
  • Are fixings accessible?

Channels and clips allow safer removal than adhesive-only methods.


12. Final Pre-Installation Safety Checklist

Before installation begins, confirm:

  • ✅ Mirror size and weight verified
  • ✅ Correct thickness selected
  • ✅ Wall inspected and prepared
  • ✅ Fixings load-rated and suitable
  • ✅ Installation method planned
  • ✅ Clearance allowed
  • ✅ Edges polished and safe
  • ✅ Two-person lift arranged
  • ✅ Tools and PPE ready

If any item is unchecked—pause and correct it.


Choosing the Right Mirror Before Installation

Safe installation starts with the right mirror specification.

If you’re planning a large mirror project, choose a supplier that allows full control over:

  • Size
  • Thickness
  • Edge finish
  • Application guidance

You can explore made-to-measure mirrors suitable for large installations here:


Final Thoughts

Large mirrors are visually powerful—but only when installed safely.

Most mirror accidents are preventable. They happen because of:

  • Poor planning
  • Incorrect fixings
  • Rushed installation
  • Underestimating mirror weight

By following this checklist, you protect:

  • Your walls
  • Your investment
  • Your safety

A properly installed large mirror should feel solid, secure, and worry-free for years to come.

DIY Guide

Common Mistakes People Make When Ordering Custom Cut Mirrors

Dec 26, 2025

Custom cut mirrors are designed to fit perfectly, enhance light, and elevate interiors. But because they are made to exact measurements, small mistakes during ordering can become expensive problems.

Whether you’re buying a mirror for a bathroom, hallway, gym, or furniture project, understanding the most common ordering mistakes can save time, money, and frustration.

This guide highlights the most frequent errors people make when ordering custom mirrors—and how to avoid them.


1. Measuring Only Once

Walls are rarely straight. Tiles, plaster, and older construction introduce small variations that matter when ordering glass.

What Goes Wrong

  • Mirror is too tight to install
  • Edges collide with tiles or trims
  • Stress cracks appear during fitting

How to Avoid It

  • Measure width and height in at least three places
  • Always use the smallest measurement
  • Re-measure on a different day if possible

Interior design professionals regularly recommend double- and triple-checking mirror measurements to account for wall irregularities.

Authority reference: Houzz


2. Forgetting Installation Clearance

A mirror cut to the exact wall size almost never fits cleanly.

Why This Causes Problems

  • Walls are not perfectly flat
  • Adhesive and fixings need space
  • Minor movement occurs during installation

Best Practice

  • Allow 3–5 mm total clearance for small–medium mirrors
  • Allow up to 10 mm for large mirrors or tiled walls

This clearance is invisible once installed but makes fitting far safer.


3. Ignoring Sockets, Lights & Fixtures

One of the most common oversights is measuring the wall—but not what’s on it.

Typical Issues

  • Mirror blocks sockets or switches
  • Lights cast shadows across the mirror
  • Cabinets can’t open properly

How to Avoid It

  • Mark the mirror outline with masking tape
  • Check doors, drawers, and light positions
  • Measure the usable mirror area, not just the wall

Professional designers often tape out mirror sizes on the wall before ordering to confirm alignment.


4. Choosing the Wrong Mirror Thickness

Mirror thickness affects strength, distortion, and safety.

Common Mistakes

  • Using thin mirrors for large sizes
  • Choosing thickness purely on price
  • Not matching thickness to installation method

General Guidance

  • 4 mm → Small decorative mirrors
  • 6 mm → Standard bathroom mirrors
  • 8 mm+ → Large mirrors, gyms, feature walls

Thicker mirrors sit flatter and feel more substantial—especially at larger sizes.


5. Not Planning the Installation Method First

Ordering the mirror before deciding how it will be mounted is a major mistake.

What Can Go Wrong

  • Adhesive used for mirrors that are too heavy
  • Clips placed under stress
  • No allowance for channels or brackets

Solution

Choose the installation method before ordering:

  • Adhesive → Small to medium mirrors
  • Clips → Removable or heavier mirrors
  • Channels → Large or wall-to-wall mirrors
  • Frameless systems → Feature or luxury mirrors

Installation method influences thickness, edge finish, and tolerances.


6. Ordering the Wrong Edge Finish

Edges aren’t just cosmetic—they’re about safety.

Common Errors

  • Exposed mirrors with unfinished edges
  • Decorative bevels where space is tight
  • Forgetting to specify edge finish at all

Correct Approach

  • Polished edges → Exposed mirrors
  • Raw/hidden edges → Framed mirrors only
  • Bevelled edges → Decorative feature mirrors

Unfinished exposed edges are both unsafe and visually poor.


7. Mixing Up Width & Height

Orientation errors happen more often than people expect.

Typical Problems

  • Portrait ordered instead of landscape
  • Supplier interprets dimensions differently
  • Mirror arrives rotated incorrectly

Best Practice

Always specify clearly:

Width × Height (mm)

Example:

1200 mm (W) × 800 mm (H)

Never rely on assumptions.


8. Ignoring Reflection & Placement Impact

Mirrors reflect everything—including things you may not want to highlight.

Common Style Mistakes

  • Reflecting clutter or storage areas
  • Harsh glare from lights or windows
  • Oversized mirrors dominating a space

Architectural Digest stresses that mirror placement should always consider reflection lines and room balance, not just wall size.

Authority reference:
👉 https://www.architecturaldigest.com


9. Not Considering the Room Environment

Different rooms require different mirror specifications.

Environmental Factors

  • Bathrooms → Moisture & steam
  • Gyms → Impact resistance
  • Hallways → High traffic
  • Kitchens → Frequent cleaning

Ignoring environment can shorten mirror lifespan or create safety issues.


10. Assuming Custom Mirrors Are Returnable

This is one of the most costly misunderstandings.

Custom mirrors are cut specifically to your measurements and usually cannot be returned unless faulty.

What This Means

  • Measurements must be final
  • Rushing the order increases risk
  • Errors usually can’t be corrected later

Always double-check everything before confirming.


11. Ordering Without Full Specification Control

Some suppliers offer limited options, increasing risk.

Red Flags

  • No thickness choices
  • No edge finish selection
  • Unclear measuring guidance
  • No installation advice

Choosing a supplier that allows full customisation reduces mistakes.

If you’re planning a project, explore made-to-measure mirrors that give control over size, thickness, and finish:


Quick Checklist Before Ordering

Before placing your order, confirm:

  • ✅ Measured multiple times
  • ✅ Clearance included
  • ✅ Fixtures checked
  • ✅ Thickness chosen
  • ✅ Installation method planned
  • ✅ Edge finish selected
  • ✅ Orientation clearly stated

Final Thoughts

Almost all problems with custom mirrors come down to ordering mistakes, not manufacturing defects.

By taking time to:

  • Measure carefully
  • Plan installation
  • Consider environment and reflections

You can ensure your custom mirror fits perfectly, installs safely, and looks exactly as intended.

DIY Guide

Mirror Installation Options: Adhesive, Clips, Channels or Frameless Mounting

Dec 26, 2025

Choosing the right mirror is only half the job. How the mirror is installed plays an equally important role in safety, durability, and visual finish. A perfectly sized mirror can still look unfinished—or worse, become a hazard—if the wrong installation method is used.

Whether you’re installing a bathroom mirror, a wall-to-wall gym mirror, or a decorative feature panel, understanding the four main mirror installation options—adhesive, clips, channels, and frameless mounting—will help you make the right decision.

This guide explains how each method works, where it’s best used, and what to consider before choosing one.


Why Mirror Installation Method Matters

Mirrors are heavy, rigid, and unforgiving. Unlike pictures or lightweight wall décor, mirrors require:

  • Secure load-bearing support
  • Correct spacing and alignment
  • Long-term resistance to moisture and movement
  • A clean, intentional visual finish

According to building and interior safety guidance, incorrect mirror installation is one of the most common causes of mirror cracking or detachment—especially in bathrooms and high-traffic areas.

Choosing the right fixing method is therefore both a design and safety decision.


1. Adhesive Installation (Glue-Mounted Mirrors)

What Is Adhesive Mirror Installation?

Adhesive installation uses specialist mirror adhesive to bond the mirror directly to the wall without visible fixings.

Where Adhesive Works Best

  • Bathroom vanity mirrors
  • Decorative wall mirrors
  • Hallways and bedrooms
  • Lightweight to medium-sized mirrors

Advantages

  • Clean, minimalist appearance
  • No visible hardware
  • Fast installation
  • Cost-effective

Important Considerations

  • Only mirror-safe adhesive should be used
  • Wall surface must be flat, clean, and sound
  • Not suitable for very large or heavy mirrors
  • Removal usually damages the wall

The NHBC (National House Building Council) advises that adhesives should always be compatible with mirror backing to prevent long-term degradation.

Authority reference:
👉 https://www.nhbc.co.uk/binaries/content/assets/nhbc/tech-guidance/tech-guidance-notes/tgn-adhesives.pdf


2. Mirror Clips (Mechanical Fixings)

What Are Mirror Clips?

Mirror clips are visible mechanical fixings—usually placed at the top and bottom or corners of the mirror—to physically hold it in place.

Where Mirror Clips Are Commonly Used

  • Bathrooms
  • Utility rooms
  • Commercial spaces
  • Rental properties

Advantages

  • Strong mechanical support
  • Easier removal or replacement
  • Suitable for heavier mirrors
  • Compatible with most wall types

Drawbacks

  • Visible hardware affects aesthetics
  • Requires accurate drilling
  • Incorrect placement can stress the glass

Mirror clips are often chosen when safety and removability are more important than a seamless look.

According to This Old House, mechanical fixings remain one of the safest options for mirrors in moisture-prone or high-use areas.

Authority reference:
👉 https://www.thisoldhouse.com/


3. Channel Systems (Bottom Rail or Full Channel)

What Is Channel Mounting?

Channel installation uses a metal or aluminium channel fixed to the wall. The mirror sits inside the channel, often supported at the bottom and stabilised at the top.

Where Channel Systems Excel

  • Large bathroom mirrors
  • Wall-to-wall gym mirrors
  • Commercial installations
  • Feature wall panels

Advantages

  • Excellent load distribution
  • Clean, professional appearance
  • Ideal for large mirrors
  • Allows small expansion tolerances

Things to Watch

  • Requires precise measurements
  • Slightly more complex installation
  • Visible channel edges (though minimal)

Channel mounting is widely used in gyms and commercial interiors because it balances safety, alignment, and aesthetics.

Many professional installers prefer channels for large mirrors because they reduce stress points compared to adhesive alone.


4. Frameless Mounting Systems (Floating Mirrors)

What Is Frameless or Floating Mounting?

Frameless mounting creates the illusion that the mirror is floating slightly away from the wall, often using hidden brackets, stand-offs, or rear mounting systems.

Where Frameless Mounting Works Best

  • Luxury bathrooms
  • Modern interiors
  • Feature mirrors
  • Back-lit or LED mirrors

Advantages

  • Premium, high-end appearance
  • Allows space for lighting or ventilation
  • No visible fixings on the face
  • Works well with thick mirrors

Considerations

  • Higher installation cost
  • Requires accurate planning
  • Best installed by professionals
  • Wall condition must be excellent

Frameless mounting is often paired with LED lighting to create dramatic visual effects and depth.

Interior design publications frequently highlight floating mirrors as a defining feature of modern, minimalist bathrooms.


Comparing the Installation Methods

Installation MethodBest ForVisual LookStrength
AdhesiveSmall–medium mirrorsSeamlessMedium
ClipsBathrooms, rentalsVisible fixingsHigh
ChannelsLarge mirrors, gymsClean, professionalVery high
FramelessLuxury interiorsPremiumHigh

Choosing the Right Method for Your Mirror

Before deciding, ask yourself:

✔ Mirror Size & Weight

  • Larger mirrors need mechanical support
  • Small mirrors may suit adhesive

✔ Location

  • Bathrooms require moisture resistance
  • Gyms need impact-safe mounting

✔ Visual Preference

  • Minimalist → adhesive or frameless
  • Functional → clips or channels

✔ Future Removal

  • Planning renovations? Choose clips or channels

Safety & Compliance Considerations

In the UK, mirrors used in certain locations may need to comply with safety glazing standards such as BS EN 12600, particularly in areas where impact risk exists.

While not all mirrors require safety backing, installation method plays a key role in reducing risk.

The British Standards Institution outlines guidance on glazing safety and impact resistance.

Authority reference:
👉 https://www.bsigroup.com/en-GB/standards/bs-en-12600/


Common Installation Mistakes to Avoid

  • Using general construction adhesive instead of mirror adhesive
  • Relying on adhesive alone for large mirrors
  • Poor wall preparation
  • Misaligned clips causing stress points
  • Ignoring wall moisture levels

Most installation failures are due to method mismatch, not poor mirrors.


Choosing the Right Mirror Before Installation

Regardless of how you install it, the mirror itself must be correctly specified.

If you’re planning a project, explore made-to-measure mirrors that allow control over size, thickness, and edge finish:

Custom sizing ensures compatibility with any installation method, reducing stress and improving results.


Final Thoughts

There is no single “best” mirror installation method—only the right method for your mirror, wall, and space.

  • Adhesive suits clean, minimalist designs
  • Clips prioritise safety and removability
  • Channels excel for large or commercial mirrors
  • Frameless mounting delivers premium aesthetics

When installation method, mirror size, and environment are aligned, the result is safe, durable, and visually flawless.

Mirrors

Custom Mirrors for Furniture: Tables, Cabinets & Wall Panels

Dec 26, 2025

Custom mirrors are no longer limited to bathrooms and hallways. Today, they are increasingly being used directly on furniture—from dining tables and cabinets to decorative wall panels—creating interiors that feel brighter, more spacious, and distinctly high-end.

Unlike standard mirrors, cut-to-size mirrors are made to precise dimensions, allowing them to integrate seamlessly with furniture pieces rather than looking like afterthoughts. When done correctly, mirrored furniture enhances light, improves visual balance, and elevates the overall design of a room.

This guide explores how and where custom mirrors work best on furniture, what to consider before ordering, and how to avoid common mistakes.


Why Custom Mirrors Are Ideal for Furniture Applications

Furniture dimensions vary widely, and even small measurement errors can ruin the look—or safety—of mirrored surfaces. Custom mirrors allow you to:

  • Match exact furniture measurements
  • Achieve a flush, built-in appearance
  • Choose appropriate mirror thickness
  • Control reflections and symmetry
  • Avoid overhangs, gaps, or sharp edges

Interior design authorities frequently highlight mirrors as a tool to add depth and brightness when incorporated thoughtfully into furniture and architectural elements. According to Architectural Digest, mirrors can visually expand a room and elevate furniture design when proportion and placement are handled correctly.


Mirrored Table Tops: Dining, Coffee & Console Tables

One of the most popular uses of custom mirrors on furniture is mirrored table tops.

Where Mirrored Table Tops Work Best

  • Dining tables
  • Coffee tables
  • Console tables
  • Side tables
  • Dressing tables

Why Custom Sizing Matters

Tabletops require absolute precision. A mirror that is even slightly oversized can create sharp overhangs, while one that’s undersized looks unfinished.

Custom cut mirrors allow:

  • Exact alignment with table edges
  • Rounded or softened corners for safety
  • Thicker glass for durability
  • Clean, polished edges for exposed surfaces

Mirrored tabletops are especially effective in smaller dining or living rooms, where they visually lighten heavy furniture and reflect light around the space.


Mirrored Cabinet Doors & Furniture Fronts

Mirrors are increasingly being used on cabinet doors and furniture fronts to enhance storage units without adding visual bulk.

Common Applications

  • Wardrobe doors
  • Bedroom cabinets
  • Sideboards and buffets
  • Display cabinets
  • Bar units
  • Bathroom storage furniture

Why Custom Mirrors Are Essential

Cabinet doors involve hinges, handles, and frames. Custom mirrors can be cut to:

  • Fit within framed panels
  • Align perfectly with hardware
  • Avoid hinge interference
  • Maintain consistent margins

According to The Spruce, mirrored furniture fronts are particularly effective in small rooms because they reflect light while maintaining storage functionality.


Mirrored Wall Panels Behind Furniture

Another popular application is using custom mirrors as wall panels positioned behind furniture.

Where They’re Commonly Used

  • Behind dining sideboards
  • Above hallway console tables
  • Behind sofas as feature panels
  • Behind dressing tables
  • Behind bar units or shelving

Benefits of Mirrored Wall Panels

  • Adds depth without physical bulk
  • Reflects natural and artificial light
  • Enhances symmetry
  • Creates a luxury, architectural feel

Large mirrored wall panels must be precisely measured, often divided into sections for safety and easier installation—something only custom mirrors can accommodate properly.


Bedroom Furniture with Custom Mirrors

In bedrooms, mirrors serve both functional and aesthetic purposes.

Ideal Uses

  • Wardrobe door mirrors
  • Dressing table mirrors
  • Decorative panels above furniture

Design Considerations

  • Mirrors should align exactly with furniture widths
  • Reflections should not be visually distracting
  • Neutral mirror finishes work best in restful spaces

Custom sizing ensures wardrobe mirrors sit flush with door panels, creating a tailored, built-in look rather than a mismatched or floating appearance.


Living Room Furniture with Mirrored Elements

Living rooms benefit from mirrored furniture when mirrors are used strategically and in moderation.

Effective Applications

  • Mirrored console tables
  • Sideboards with mirrored fronts
  • Coffee tables with mirrored tops
  • Feature mirror panels behind furniture

Mirrored furniture helps reflect light and reduce the visual weight of large pieces, making the room feel more open and balanced.


Kitchens & Dining Areas: A Subtle but Powerful Use

While less common, mirrors can work beautifully in kitchens and dining rooms when applied selectively.

Examples

  • Mirrored cabinet panels on feature units
  • Mirror panels above dining sideboards
  • Decorative mirror backs behind open shelving

Kitchens demand precise sizing and durable finishes, making custom mirrors essential for a clean, professional result.


Home Office Furniture & Storage Units

Mirrors can improve both light and comfort in home offices.

Smart Uses

  • Mirrored cabinet fronts
  • Mirror panels behind shelving
  • Decorative mirrors near windows

In smaller home offices, mirrors reduce the boxed-in feeling and help distribute natural light more evenly across the room.


Choosing the Right Mirror for Furniture Use

Before ordering a custom mirror for furniture, consider the following:

✔ Thickness

  • Thicker mirrors for tables and doors
  • Thinner mirrors for decorative wall panels

✔ Edge Finish

  • Polished edges for exposed surfaces
  • Hidden edges acceptable within frames

✔ Safety

  • Rounded corners for tabletops
  • Secure fixing methods for doors and panels

✔ Reflection Planning

  • Avoid reflecting clutter or harsh light
  • Consider sightlines and room layout

Custom mirrors give you full control over all these factors.


Common Mistakes to Avoid

  • Using standard mirrors that don’t match furniture dimensions
  • Ignoring edge finishes on exposed surfaces
  • Choosing mirrors that are too thin for daily use
  • Forgetting hinge and handle clearances
  • Overusing mirrors in a single room

Most of these issues are avoided simply by choosing cut-to-size mirrors instead of off-the-shelf options.


Where to Buy Custom Mirrors for Furniture Projects

If you’re planning a mirrored furniture project, choosing a supplier that offers full size, thickness, and finish control is essential.

👉 Explore custom cut to size mirrors suitable for furniture, cabinets, and wall panels here.


Final Thoughts

Custom mirrors for furniture are not just decorative—they are design tools that enhance light, improve proportions, and elevate interiors.

When mirrors are:

  • Precisely sized
  • Correctly specified
  • Thoughtfully positioned

They transform ordinary furniture into bespoke, high-end features that feel intentional and refined.

Mirrors

Where Can You Use Cut-to-Size Mirrors in the Home? (Room-by-Room Guide)

Dec 26, 2025

A Room-by-Room Guide to Mirror Placement and Design

Mirrors are one of the most powerful interior design elements you can use in your home. They serve both functional and aesthetic purposes — from reflecting light and creating the appearance of a larger space to providing essential utility in bathrooms and closets. But custom cut-to-size mirrors take those benefits even further by offering a perfect fit for your walls, nooks, and creative design ideas that standard mirrors simply can’t match.

In this guide, we’ll take you through how cut-to-size mirrors can be used in nearly every room, why they’re a great choice, and how to maximize their impact. As you’re exploring options, don’t forget to check out this comprehensive range of beautiful mirror solutions at GlassHelp Mirrors — perfect for inspiration and ordering custom sizes.

➡️ Explore mirror products and ideas here:
👉 https://www.glasshelp.co.uk/mirrors/ — high-quality mirror solutions for every room.


Why Choose Cut-to-Size Mirrors?

Before diving room by room, it’s worth understanding what cut-to-size mirrors bring to the table:

  • Perfect fit: Custom sizes mean you can fill awkward or unique wall spaces that off-the-shelf mirrors can’t.
  • Seamless design: Eliminate gaps, mismatched proportions, and awkward framing.
  • Greater flexibility: Work with curved walls, stairwells, above vanities, around fixtures, and more.
  • Design continuity: Want a wall-to-ceiling mirrored vestibule or flush panels in a boutique-style bathroom? Custom mirrors make it seamless.

These benefits make them ideal for transforming everyday rooms into thoughtful, practical, and stylish spaces. Designers also note that mirrors enhance light, create visual depth, and add character in almost every corner of the home — from entryways to bedrooms. HomeLane


Entryway & Hallway: First Impressions That Reflect Light

The entryway is the first space guests see — and one of the most impactful places to use mirrors.

How to Use Mirrors Here

  • A vertical custom mirror near the front door lets you check your outfit before you head out.
  • Floor-to-ceiling or wall panels can visually double the sense of space in narrow hallways.
  • Opposite a light source, mirrors bounce natural and artificial light into usually dim entry spaces.

💡 Mirrors in entryways serve both function and form, welcoming people into your home while making the area feel more expansive. Garrety Home Pros – Garrety Glass, Inc.


Living Room: Make Every Square Foot Count

Living rooms are prime real estate for mirror placement.

Creative Uses

  • Over a sofa or mantle: A custom mirror can become a design focal point, tying together décor and reflecting ambient light.
  • Large wall mirrors: Ideal for smaller living rooms — they create an illusion of more space and depth.
  • Clusters of mirrored panels: Play with shapes and segmentation to create an art-like installation.

Design experts encourage using mirrors to reflect light and brighten spaces, especially near windows or light fixtures. HomeLane


Bathroom: Style Meets Utility

No personal grooming space is complete without mirrors — but custom cut-to-size models take function a notch higher.

Best Bathroom Uses

  • Custom vanity mirrors: Fit perfectly between vanity lighting or cabinets without unsightly gaps.
  • Full-wall mirrors: Great for visual openness in smaller bathrooms.
  • Integrated medicine cabinets: Flush mounted mirrors that open for storage — elegant and practical.

🧠 Pro tip: If your bathroom has recessed lighting, towel racks, or niche shelves, a custom mirror can be cut to avoid obstructions and fit around features precisely — something standard mirrors rarely do.


Bedroom & Dressing Areas: Beauty Meets Function

Bedrooms are personal spaces — which means mirror placement should balance aesthetics and functionality.

Typical Uses

  • Full-length mirrors: A custom cut mirror can cover entire wardrobe doors or a bedroom wall for seamless reflection.
  • Above dressers: Matching dresser widths precisely with a mirror gives a curated, intentional look.
  • Walk-in closet mirrors: Maximizes utility and style in dressing areas, without wasting wall space.

💡 Designers often emphasize that correctly placed bedroom mirrors boost both the perception of space and daily convenience. Parachute Home


Dining Room: Subtle Elegance

While not always the first place people think of mirrors, dining rooms benefit hugely from reflective surfaces.

Ideas

  • Opposite windows or art walls: Mirrors reflect views and additional light, enhancing ambience during dinner parties.
  • Mirrored buffet backdrop: Place a custom mirror above sideboards or buffets to elevate décor and depth.

✨ A well-placed dining room mirror expands the conversational space, making the room feel livelier and more luxurious.


Kitchen: Light, Depth, and Unexpected Flair

Mirrors aren’t just for bedrooms and bathrooms — they can be stylish tools in the kitchen too.

Fun & Functional Uses

  • Mirrored backsplash: Reflects light and surfaces, making small kitchens appear larger.
  • Above open shelving: Adds endless depth and visual intrigue.
  • As accent segments: Use small custom mirror panels around windows or coffee bars to add brightness without overpowering the design.

Design blogs note that mirrors expand space perception and bring vibrancy to compact areas like kitchens. Demers Glass


Stairwells & Nooks: Unexpected Enhancements

Custom mirrors shine in places most homeowners overlook:

  • Stair landings: A vertical mirror panel can make a narrow vertical space feel wider.
  • Reading nooks: Reflect natural light into reading corners for a cozy effect.
  • Small studies: A mirror near a window can brighten and make even tight offices feel more open.

🧠 Clever mirror placement can turn once-ignored corners into design highlights.


Bonus: Mirrors as Art & Decor Elements

Beyond practicality, mirrors can be decor heroes:

  • Use mirrored geometric tiles for statement walls.
  • Mirror a portion of a bookshelf to add dimension to your décor.
  • Frame cut mirrors with wood, brass, or coloured metal for artistic flair.

Modern interior designers often leverage mirrors not just for reflection but as artistic statements that influence how a room feels and performs.


Final Thoughts

Cut-to-size mirrors are one of the most versatile and impactful home décor elements you can invest in. Whether you’re refreshing a living room, expanding a tiny bathroom, or adding brightness to a hallway, custom mirrors combine function and beauty in ways standard inventory mirrors simply can’t match.

Ready to explore mirror options that fit your space perfectly?
👉 Visit GlassHelp’s mirror collection for inspiration and custom ordering: https://www.glasshelp.co.uk/mirrors/

DIY Guide

How to Measure Correctly for a Custom Cut-to-Size Mirror (Avoid Costly Mistakes)

Dec 26, 2025

Ordering a custom cut-to-size mirror is one of the smartest ways to achieve a clean, built-in, professional look in your home. But it also leaves zero room for error. A mirror that’s even a few millimetres too large—or awkwardly sized for its surroundings—can mean delays, extra costs, or a result that simply doesn’t look right.

This guide walks you through exactly how to measure for a custom mirror, step by step, so you can order with confidence and avoid the most common (and expensive) mistakes homeowners make.

Whether you’re fitting a bathroom mirror, a hallway feature, or a full-width gym mirror, the principles below apply.


Why Measuring for a Custom Mirror Is Different

Unlike standard mirrors, custom mirrors are cut specifically to your measurements. That means:

  • No trimming or resizing later
  • No “close enough” adjustments
  • No returns if the size is wrong

Once the mirror is cut, the measurements must be right the first time.

This is why correct measuring is more important than choosing the mirror style itself.


Tools You’ll Need (Don’t Skip This)

Before you start, gather the right tools:

  • Steel tape measure (not fabric)
  • Pencil and notepad
  • Spirit level (or phone level app)
  • Masking tape (optional but very useful)

Avoid measuring with guesswork or memory. Always write measurements down.


Step 1: Measure the Actual Wall Space (Not What You Think It Is)

Walls are rarely as perfect as they look.

Measure in Three Places

For both width and height, measure:

  1. Top
  2. Middle
  3. Bottom

Walls can bow slightly, especially in older homes or tiled bathrooms.
👉 Always use the smallest measurement.

Example:

  • Top width: 1002 mm
  • Middle width: 1000 mm
  • Bottom width: 998 mm

👉 Order 998 mm, not 1000 mm.

This alone prevents most fitting issues.


Step 2: Account for Clearance (This Is Where Many People Go Wrong)

A mirror that fits “exactly” edge-to-edge often doesn’t fit at all once installed.

Leave Clearance For:

  • Wall unevenness
  • Adhesive thickness
  • Fixings or brackets
  • Slight installation movement

Recommended clearance:

  • Leave 3–5 mm total clearance on width and height for tight spaces
  • For large mirrors, up to 10 mm total is safer

This tiny gap is visually invisible but makes installation stress-free.


Step 3: Measure Relative to Furniture (Not Just the Wall)

Mirrors don’t exist in isolation.

For Vanity or Console Mirrors

A good rule:

  • Mirror width = ⅔ to ¾ the width of the furniture below

Too small looks lost.
Too large overwhelms the space.

If you’re unsure how mirror proportions affect a room, this guide explains it clearly:
Wall mirror sizes explained: avoid ordering the wrong one


Step 4: Check for Obstacles You Can’t Ignore

Before finalising measurements, look carefully for:

  • Plug sockets
  • Light switches
  • Wall lights
  • Extractor fans
  • Tile trims or grout lines
  • Sloped ceilings

Pro Tip

Use masking tape to mark the mirror outline on the wall.
This helps you visually confirm:

  • Height feels right
  • Lights aren’t blocked
  • Reflections line up correctly

Step 5: Decide the Height Based on Eye Level

This matters more than people realise.

General Guideline

  • Centre of mirror should sit roughly at average eye level (150–160 cm)

But adjust depending on:

  • Whether the mirror is decorative or functional
  • Who primarily uses it (children vs adults)
  • Whether it’s above furniture

A mirror can be perfectly measured yet feel “wrong” if positioned too high or too low.


Step 6: Frameless vs Framed (Measure Differently)

Frameless Mirrors

  • Measure exact visible glass size
  • Include clearance as discussed earlier

Framed Mirrors

  • Measure total outer frame size
  • Confirm whether the frame overlaps the glass or adds depth

Many people accidentally order the glass size when they actually needed the framed size.


Step 7: Thickness Matters (Especially for Large Mirrors)

While thickness doesn’t change width or height, it affects safety and appearance.

Typical options:

  • 4 mm – Small decorative mirrors
  • 6 mm – Standard bathroom mirrors
  • 8 mm+ – Large mirrors, gyms, commercial use

Thinner mirrors can flex or distort at larger sizes. Always match thickness to size and location.


Step 8: Bathrooms Require Extra Planning

Bathrooms are the most common place for measurement mistakes.

Consider:

  • Steam and humidity
  • Tile lines (mirror edges rarely align perfectly with grout)
  • Wall lights casting shadows
  • Cabinets opening clearance

If you’re installing above a vanity, the mirror should not clash with taps or splash backs.


Step 9: Full-Wall or Gym Mirrors (Measure as Sections)

For large mirror walls:

  • Measure the total wall width
  • Divide into multiple panels, not one huge mirror
  • Allow consistent gaps between panels (2–3 mm)

This:

  • Improves safety
  • Simplifies installation
  • Allows replacement of one panel if damaged

Never assume a single oversized mirror is the best solution.


Step 10: Write Measurements Clearly (Avoid Costly Mix-Ups)

When submitting measurements:

  • Always specify width × height
  • Use millimetres unless told otherwise
  • Double-check orientation (portrait vs landscape)

Example:

1200 mm (W) × 800 mm (H)

Never assume the supplier will guess correctly.


Most Common Measuring Mistakes (And How to Avoid Them)

❌ Measuring once

✔ Measure at least three times

❌ Ignoring clearance

✔ Always allow 3–10 mm total tolerance

❌ Measuring only the wall

✔ Measure relative to furniture and lighting

❌ Forgetting sockets and switches

✔ Tape out the mirror area first

❌ Guessing thickness

✔ Match thickness to mirror size and location


Final Checklist Before Ordering

Before placing your order, confirm:

  • ✅ Smallest width and height used
  • ✅ Clearance included
  • ✅ Obstacles checked
  • ✅ Furniture alignment considered
  • ✅ Thickness selected correctly
  • ✅ Orientation clearly stated

If every box is ticked, you’re ready.


Ordering with Confidence

When measured correctly, a custom mirror transforms a space—clean lines, perfect proportions, and a finish that looks professionally installed.

If you’re ready to order, explore Glass Help’s range of custom cut to size mirrors, available in multiple shapes, finishes, and sizes to suit bathrooms, hallways, gyms, and feature walls.


Key Takeaway

Most mirror problems aren’t design issues—they’re measurement issues.
Take your time, measure properly, and your custom mirror will fit perfectly the first time.

Comparison

Custom Cut Mirrors vs Standard Mirrors: Which Is Better for Your Space?

Dec 26, 2025

Mirrors aren’t just “décor.” They change how a room feels, how bright it looks, and even how big it appears. The real question isn’t only which mirror looks nicer—it’s which option fits your wall, your layout, your lifestyle, and your budget with the least compromise.

In this guide, we’ll compare custom cut (made-to-measure) mirrors vs standard off-the-shelf mirrors, with practical examples so you can choose confidently.


1) What’s the difference?

Standard mirrors (off-the-shelf)

These are the ready-made mirrors you buy in common sizes (for example 60×80 cm, 70×100 cm, 90×60 cm). They’re fast and convenient, but you’re limited to what’s available.

Best for: quick upgrades, rentals, low-effort styling, common wall sizes.

Custom cut mirrors (made-to-measure)

Custom mirrors are cut to the exact size and shape you need—often with options like polished or bevelled edges, different tints, and specific thickness choices. Glass Help Ltd

Best for: awkward wall sizes, full-width vanity runs, alcoves, made-to-fit gym walls, premium “built-in” looks.


2) The biggest deciding factor: fit (and how “intentional” the room looks)

If your space has any of these, custom usually wins:

  • A wall that’s not a standard width
  • Furniture that needs a mirror two-thirds to three-quarters of its width for good proportion
  • A vanity area where you want the mirror to line up perfectly with taps/lights/cabinets
  • A narrow hallway where the wrong size mirror looks “floating” or off-centre

A well-sized mirror makes a room feel designed—while a “close enough” mirror can look like an afterthought (even if it’s expensive). For sizing guidance and proportions, this mirror size and shape guide is genuinely useful.


3) Cost: what you’re actually paying for

Standard mirror costs tend to be lower upfront

Because they’re mass-produced, standard mirrors often look like a bargain.

But watch the “hidden extras”:

  • You may need to buy a second mirror to “make it work”
  • You might pay more for a special frame to distract from awkward sizing
  • You may compromise on style (and end up replacing it sooner)

Custom mirrors cost more—but reduce compromise

With custom cut mirrors, you pay for:

  • Precise cutting to your measurements
  • Edge finishing (flat polish or bevel)
  • Shape options (including circles/ovals/irregular)
  • Potential thickness upgrades and safer installation planning Glass Help Ltd

If you’re planning a long-term room (your “main bathroom,” your home gym, a salon corner, a feature hallway), custom often has better value because you don’t have to “design around” an imperfect fit.


4) Design freedom: shape, tint, edge finish

Standard mirrors usually come in limited styles. Custom mirrors give you control over:

Shapes

  • Rectangle, square, round, oval—and sometimes more bespoke shapes Glass Help Ltd

Mirror types (the “look” of the reflection)

Different mirror finishes change the mood of a room:

  • Silver = crisp, bright reflection
  • Bronze = warm, softer ambience
  • Grey/smoked = modern, muted reflection
  • Antique = decorative, vintage character Glass Help Ltd+1

If you’re unsure which tint suits your room style, this breakdown helps: Common mirror types: silver, bronze, grey and antique. Glass Helper

Edge finish

Custom mirrors often let you choose:

  • Flat polished edge (clean, modern)
  • Bevelled edge (more decorative/premium look) Glass Help Ltd

5) Safety & practicality: when the “cheap” option can be a bad idea

This matters most in:

  • Bathrooms (humidity)
  • Gyms (impact risk)
  • Family homes (kids, high traffic areas)
  • Commercial spaces (public use)

A mirror is glass. If the mirror is too thin for its size, poorly mounted, or installed in the wrong place, it can become a safety risk.

A good rule of thumb:

  • The bigger the mirror, and the more “active” the room, the more you should care about proper spec + proper fixing.

Some guidance sources reference standards like BS EN 1036 for mirror quality and EN 12600 for impact considerations in safety glazing contexts (especially useful when you’re choosing mirrors for high-risk areas). Glass Helper
(If you’re not sure what’s appropriate for your room, ask the supplier what they recommend for that application.)


6) Room-by-room: which one is better?

Bathroom

Custom is usually better if:

  • You want a mirror that spans a vanity width neatly
  • You have wall lights/sconces that must align
  • You’re working around tiles, niches, or sloped ceilings

Standard is fine if:

  • It’s a small cloakroom
  • You’re replacing quickly on a budget

Bedroom / dressing area

Custom wins for:

  • Full-length mirrors on wardrobe doors
  • Alcove fits (between walls)
  • “Built-in” dressing table layouts

Standard wins if:

  • You want a framed decorative statement mirror and the proportions already work

Hallway / landing

Custom is often best because hallways are narrow, and sizing matters to avoid awkward reflection angles. A well-placed mirror can double brightness by bouncing natural light deeper into the home. Glass Helper

Home gym

Custom is strongly recommended for wall-to-wall mirror runs, cleaner joins, and a more professional finish. It also reduces “gaps” that make alignment and sightlines annoying during training. Glass Help Ltd

Living room feature wall

It depends:

  • If you want symmetry, precision, or a large “architectural” mirror look → custom
  • If you want a designer frame and the size works → standard

7) The decision checklist (use this and you’ll pick right 90% of the time)

Choose custom cut if you answer “yes” to any of these:

  • Do I need an exact width/height (no gaps, no “almost” fit)?
  • Is this a “main” room where the mirror should look built-in?
  • Do I want a specific shape (round/oval/custom)?
  • Do I want a specific tint (grey/bronze/antique)?
  • Is this a high-humidity or higher-risk area (bathroom/gym)?
  • Do I want a premium edge finish?

Choose standard if:

  • I need it quickly and the standard size looks correct on the wall
  • I’m styling a temporary space (rental / staging / short-term update)
  • The mirror is mostly decorative and will be framed anyway
  • My budget is tight and I’m comfortable compromising slightly on size

8) Common mistakes to avoid (especially when ordering custom)

  1. Measuring only the wall, not the “visual space.”
    Consider furniture width, wall lights, and where the reflection will land.
  2. Forgetting installation clearance.
    Sockets, switches, skirting boards, and tile edges can affect mounting.
  3. Choosing a mirror that’s “too small” above furniture.
    A mirror that’s undersized can look lost—better to match proportions deliberately. Glass Helper
  4. Not planning edge finishing.
    Exposed edges usually look best polished (especially for frameless designs). Glass Help Ltd

9) So… which is better for your space?

If your space is simple and standard sizes look right, a standard mirror can be the perfect choice—fast, affordable, and stylish.

But if your room has any “constraints” (tight width, alcoves, full runs, symmetry needs, premium finish goals), custom cut mirrors are usually the better long-term decision because they solve the real problem: fit and intention.