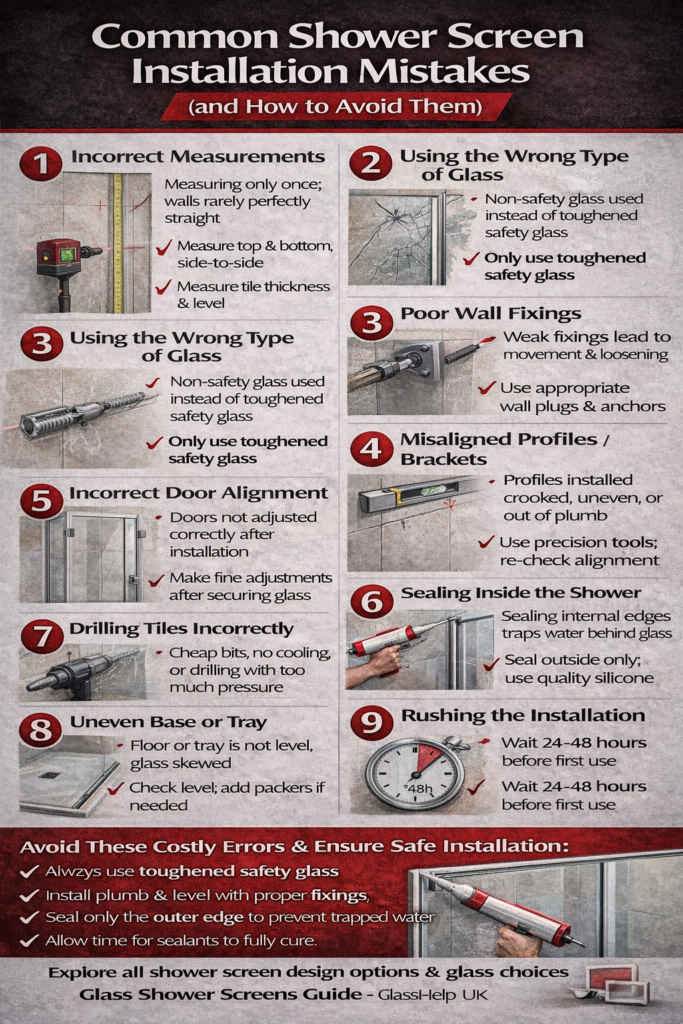
Common Shower Screen Installation Mistakes (And How to Avoid Them)
Glass shower screens instantly elevate the look and usability of a bathroom — but only when they’re installed correctly. Unfortunately, many problems homeowners face with shower screens don’t come from the glass itself, but from avoidable installation mistakes.
From leaks and misaligned doors to cracked glass and long-term safety risks, poor installation can turn a premium bathroom feature into a constant frustration.
This guide breaks down the most common shower screen installation mistakes, explains why they happen, and shows how to avoid them — whether you’re hiring an installer or planning a bathroom renovation.
Why Shower Screen Installation Errors Are So Common
Shower screens look simple, but installing them properly requires:
- Precision measurement
- Understanding of glass stress
- Correct fixing techniques
- Knowledge of water flow and sealing
Unlike timber or plastic fittings, glass cannot flex or be trimmed later. Once installed incorrectly, fixing mistakes can be expensive — or impossible — without replacing the glass.
Mistake #1: Incorrect Measurements
What Goes Wrong
Walls in bathrooms are rarely perfectly straight. Measuring only once, or measuring at a single height, often results in:
- Gaps between glass and wall
- Doors that don’t close properly
- Excessive reliance on silicone to “hide” errors
Why It’s a Problem
Glass shower screens are manufactured to size. Even a few millimeters of error can prevent proper fitting or create long-term stress on the glass.
How to Avoid It
- Measure width at top, middle, and bottom
- Measure height from finished floor or tray
- Account for tile thickness
- Allow for expansion gaps
Professional installers always measure multiple points — never trust a single measurement.
Mistake #2: Using the Wrong Type of Glass
What Goes Wrong
Some installations fail because:
- Standard (annealed) glass is used
- Glass thickness is insufficient for the design
- Glass is not properly toughened
Why It’s a Problem
Bathrooms are wet, high-impact environments. Non-safety glass can shatter dangerously, and thin glass can flex under load.
How to Avoid It
- Always use toughened safety glass
- Typical thickness:
- 6–8mm for framed or sliding screens
- 8–10mm for frameless or hinged screens
- Ensure glass is manufactured specifically for shower use
This is non-negotiable for safety.
Mistake #3: Poor Wall Fixings and Anchoring
What Goes Wrong
Fixings are often:
- Anchored into weak plasterboard without reinforcement
- Installed without proper wall plugs
- Overtightened, stressing the glass
Why It’s a Problem
Glass shower screens are heavy. Weak fixings can lead to:
- Gradual loosening
- Glass movement
- Cracking around brackets or hinges
How to Avoid It
- Identify wall type (tile, stud wall, solid masonry)
- Use appropriate anchors or reinforcement plates
- Tighten fixings evenly — never force them
A secure fixing is the foundation of a safe installation.
Mistake #4: Misaligned Wall Profiles or Brackets
What Goes Wrong
If wall profiles or brackets are not perfectly plumb:
- Doors may swing open or shut on their own
- Sliding doors may bind or derail
- Seals may not sit evenly
Why It’s a Problem
Misalignment puts constant stress on the glass and hardware, shortening lifespan and increasing breakage risk.
How to Avoid It
- Use a spirit level at every stage
- Check alignment before tightening fixings
- Re-check after placing the glass
Precision here prevents years of problems later.
Mistake #5: Incorrect Door Alignment
What Goes Wrong
Doors are often installed without fine adjustment, resulting in:
- Doors that scrape or stick
- Uneven gaps
- Doors that don’t close fully
Why It’s a Problem
Misaligned doors increase wear on hinges or rollers and compromise water containment.
How to Avoid It
- Adjust hinges or rollers after the glass is fully mounted
- Test door movement repeatedly
- Ensure even spacing along the entire edge
A well-installed door should move smoothly with minimal effort.
Mistake #6: Over-Sealing or Incorrect Silicone Application
What Goes Wrong
Many installers:
- Seal both inside and outside edges
- Use the wrong type of silicone
- Apply uneven or excessive sealant
Why It’s a Problem
Sealing internal edges traps water, leading to:
- Hidden mould growth
- Long-term water damage
- Staining behind the glass
How to Avoid It
- Seal only the external edge
- Use sanitary-grade silicone
- Allow drainage paths internally
Correct sealing is about water management, not blocking every gap.
Mistake #7: Drilling Tiles Incorrectly
What Goes Wrong
Tiles crack or chip because:
- Wrong drill bits are used
- Too much pressure is applied
- Drilling is done without cooling
Why It’s a Problem
Cracked tiles compromise waterproofing and aesthetics — and are costly to repair once the screen is installed.
How to Avoid It
- Use specialist tile or diamond drill bits
- Drill slowly with light pressure
- Avoid drilling near tile edges where possible
Patience here prevents irreversible damage.
Mistake #8: Ignoring Floor or Tray Level Issues
What Goes Wrong
Installers sometimes assume the floor or tray is level when it isn’t.
Why It’s a Problem
An uneven base can cause:
- Visible gaps
- Uneven seals
- Doors that don’t close correctly
How to Avoid It
- Check level before installation
- Use packers or adjustable profiles if needed
- Never force glass to “follow” an uneven surface
Glass must remain stress-free at all times.
Mistake #9: Rushing the Installation Process
What Goes Wrong
Installations are rushed to save time, leading to:
- Skipped alignment checks
- Poor sealing
- Inadequate curing time
Why It’s a Problem
Glass installations require careful sequencing. Rushing increases the risk of costly mistakes.
How to Avoid It
- Allow adequate time for each stage
- Follow curing times for sealants
- Perform final checks before sign-off
A proper installation is measured in precision, not speed.
Mistake #10: Using the Shower Too Soon
What Goes Wrong
Homeowners use the shower before sealant has cured.
Why It’s a Problem
Early use can break seals, causing leaks that are hard to diagnose later.
How to Avoid It
- Wait 24–48 hours after installation
- Follow installer guidance
- Avoid moisture exposure during curing
This simple step prevents long-term issues.
Choosing the Right Shower Screen to Avoid Problems
Many installation issues can be avoided by choosing a design that suits your space.
For a clear overview of styles, layouts, and glass options, this guide is useful:
👉 glass shower screens — https://www.glasshelp.co.uk/glass-shower-screens/
Understanding the right screen for your bathroom reduces installation complexity significantly.
Further Homeowner Guidance
For broader, homeowner-friendly explanations around glass use, safety, and bathroom applications, you can explore:
👉 https://www.glasshelper.co.uk/
This helps buyers make informed decisions before ordering or installing glass products.
Final Thoughts
Most shower screen problems are not product defects — they’re installation mistakes.
By understanding:
- Proper measurement
- Correct glass selection
- Secure fixing methods
- Accurate sealing techniques
You can avoid costly errors and ensure your shower screen performs safely and reliably for years.
A correctly installed glass shower screen should feel solid, operate smoothly, and remain watertight — with no surprises down the line.