How Glass Balustrades Are Installed: Step-by-Step Process
Glass balustrades are known for their clean lines, modern appearance, and ability to open up spaces — but achieving that flawless final look depends entirely on correct installation. While glass balustrades may look simple once installed, the process behind them is highly technical and precision-driven.
Whether you’re planning a glass balustrade for a staircase, balcony, terrace, or decking area, understanding how they are installed will help you:
- plan your project properly
- avoid costly mistakes
- work more confidently with installers
- ensure safety and compliance
This step-by-step guide walks you through the entire installation process, from planning and measurement to final inspection.
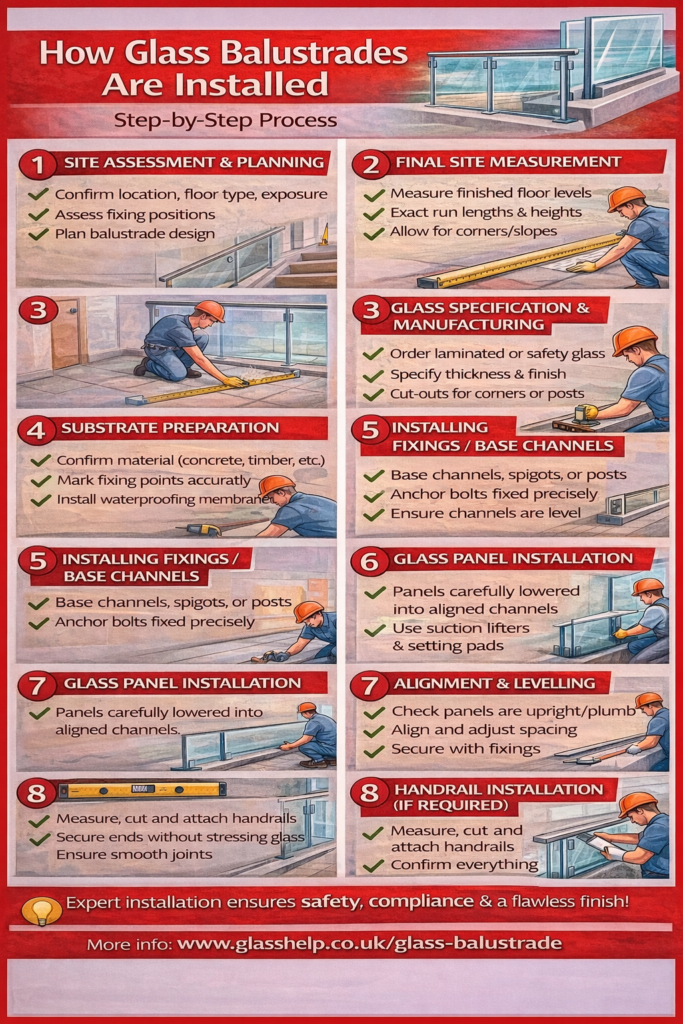
Step 1: Site Assessment & Planning
Before any glass is ordered or drilled, a professional installer carries out a site assessment. This is one of the most critical stages — and one that’s often rushed on poorly managed projects.
What Happens at This Stage:
- Identify where the balustrade will be installed (staircase, balcony, terrace, etc.)
- Measure drop heights and confirm where guarding is required
- Check floor type (concrete, steel, timber, decking)
- Assess exposure (indoor vs outdoor, wind, moisture)
- Identify fixing positions and edge distances
Why This Step Matters:
Balustrades are guarding systems, not decorative glass. Poor early planning can lead to:
- non-compliant heights
- incorrect glass type
- fixings that don’t anchor into structural material
At this stage, installers also confirm whether the design requires laminated or toughened laminated glass, especially for frameless systems.
If you’re still deciding on system types, reviewing compliant glass balustrade systems helps align design with installation requirements:
Step 2: Final Site Measurement (After Finishes)
Once floors, tiles, decking, or screed are complete, a final site measure is carried out.
What’s Measured:
- Finished floor levels
- Exact run lengths
- Glass panel heights
- Changes in level or slope
- Corners, returns, and stair angles
Why Timing Is Crucial:
Installing or measuring before finished floor levels are set is one of the most common causes of failure. Even a 10–15 mm change in floor height can:
- reduce balustrade height below legal minimums
- leave exposed fixings
- require expensive glass remakes
Professional installers measure to millimetre accuracy at this stage.
Step 3: Glass Specification & Manufacturing
After final measurements, the glass is specified and manufactured.
Typical Glass Specification Includes:
- Glass type (laminated / toughened laminated)
- Thickness (often 10.8 mm, 12.8 mm, or thicker)
- Edge finish (polished edges)
- Cut-outs or notches (for stairs or posts)
- Transparency choice (clear, frosted, tinted, low-iron)
For balustrades where the glass forms the primary safety barrier, laminated glass is essential because it remains in place even if broken.
Manufacturing lead time typically ranges from 1 to 3 weeks, depending on complexity.
Step 4: Substrate Preparation
Before any fixings are installed, the surface must be prepared properly.
What This Involves:
- Confirming fixings will anchor into structural material
- Checking slab thickness and edge distances
- Marking fixing locations accurately
- Installing waterproofing membranes (outdoor installations)
Common Errors at This Stage:
- Fixing into screed instead of concrete
- Drilling too close to slab edges
- Ignoring drainage requirements in base channels
Correct substrate preparation ensures the balustrade can resist horizontal loads, not just vertical weight.
Step 5: Installing Fixings or Base Channels
The fixing method depends on the balustrade system.
Common Fixing Types:
- Base channels (frameless systems)
- Spigots or clamps
- Posts with infill panels
Installation Process:
- Fixings are set out using laser levels
- Anchor bolts are installed to precise torque values
- Base channels are levelled and aligned
- Drainage holes are checked (outdoor systems)
Why Precision Matters:
Once fixings are installed, adjustment options are limited. Misaligned fixings lead to:
- leaning glass
- uneven spacing
- visual defects that are impossible to hide
Step 6: Glass Panel Installation
Glass panels are delivered and installed only after fixings are fully secure.
How Glass Is Installed:
- Protective edge pads and setting blocks are placed
- Glass panels are lifted into position using suction lifters
- Panels are seated gently — never forced
- Temporary supports may be used for alignment
Key Safety Practices:
- Glass must never rest directly on concrete or metal
- Edges must be protected at all times
- Installers wear cut-resistant gloves and safety footwear
Even small edge damage can compromise the strength of safety glass.
Step 7: Alignment, Levelling & Adjustment
This stage determines how good the finished balustrade looks.
What Installers Do:
- Check vertical plumb using laser levels
- Ensure consistent panel spacing
- Align glass across multiple sections
- Make micro-adjustments before final tightening
Why This Step Is So Important:
Glass magnifies errors. A 2–3 mm misalignment can be visible from across the room or terrace.
Professional installers take time here — rushing leads to poor results.
Step 8: Handrail or Top Rail Installation (If Required)
Not all glass balustrades require a handrail, but many do depending on:
- location
- height
- building control requirements
Installation Includes:
- Measuring and cutting handrail sections
- Securing rails without stressing glass
- Ensuring smooth transitions at joints and corners
Handrails add rigidity and user comfort but do not replace correct glass specification.
Step 9: Sealing, Finishing & Drainage Checks
Once glass and rails are installed, finishing work begins.
Tasks Include:
- Applying compatible sealants (if required)
- Checking drainage channels remain open
- Cleaning glass panels
- Removing protective films
- Tightening fixings to final torque
Outdoor installations are checked carefully to ensure:
- water can escape
- no sealant blocks drainage paths
Step 10: Final Inspection & Safety Check
Before handover, installers carry out a final inspection.
Final Checks:
- Balustrade height compliance
- Glass security and stability
- Fixing tightness
- Visual alignment
- No sharp edges or exposed fixings
Homeowners should also:
- gently apply pressure to check rigidity
- visually inspect alignment
- confirm warranty details
How Long Does Installation Take?
Typical installation times:
- Small internal staircase: 1 day
- Balcony or terrace run: 1–2 days
- Large or complex projects: 2–3 days
Most time is spent on accuracy, not speed.
Final Thoughts
Installing a glass balustrade is a precision process, not a simple fit-and-forget job. Each step — from planning and measurement to alignment and final checks — plays a vital role in safety, appearance, and long-term performance.
By understanding how glass balustrades are installed step by step, homeowners can:
- ask better questions
- spot shortcuts early
- ensure their investment delivers both safety and style
If you’re planning a project, starting with correctly engineered glass balustrade systems will make every installation step smoother: