How Glass Shower Screens Are Installed: Step-by-Step Process
Installing a glass shower screen is one of the most effective ways to upgrade a bathroom — but it’s also a task that demands precision, planning, and a clear understanding of how glass behaves in wet environments.
Whether you’re planning a renovation or simply want to understand what happens during professional installation, this guide walks you through the complete step-by-step process of installing a glass shower screen, from measurement and preparation to final sealing and safety checks.
This is not a DIY shortcut guide — it’s a realistic, buyer-focused explanation of how glass shower screens are properly installed in UK homes.
Why Correct Installation Matters
Glass shower screens are made from toughened safety glass, which is strong but unforgiving if installed incorrectly. Poor installation can lead to:
- Water leaks
- Glass stress and cracking
- Misaligned doors
- Unsafe movement or hardware failure
Correct installation ensures:
- Long-term durability
- Proper water containment
- Compliance with bathroom safety standards
Understanding the process helps homeowners make better decisions — and spot poor workmanship early.
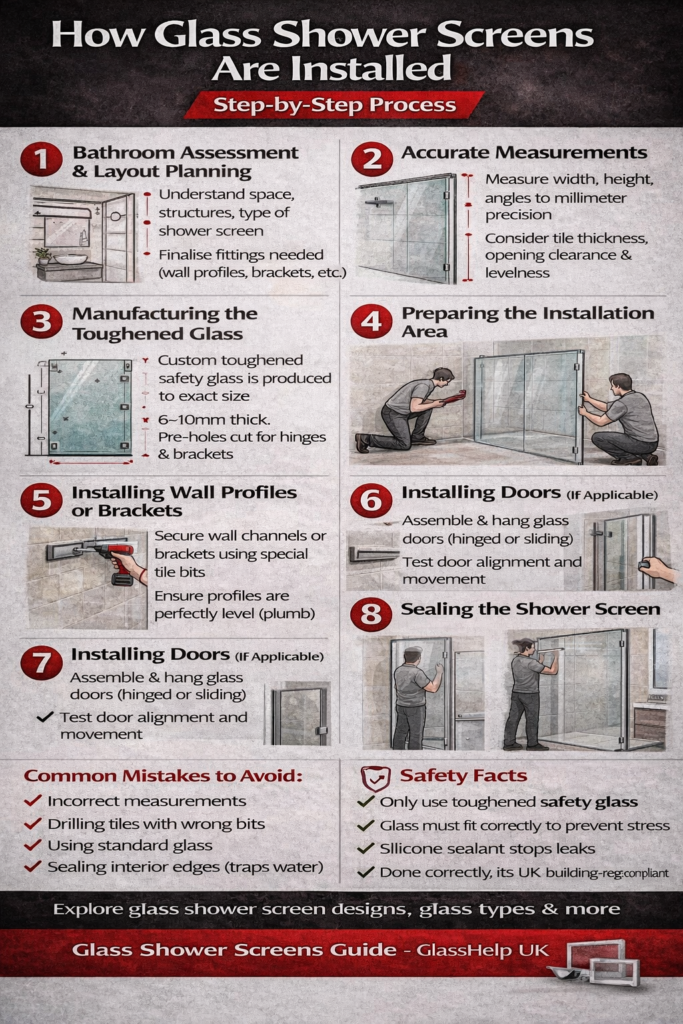
Step 1: Bathroom Assessment & Layout Planning
Before any glass is ordered, the bathroom layout is carefully assessed.
What professionals check:
- Shower tray or wet-room floor level
- Wall condition (tile, plasterboard, concrete)
- Available opening space (important for hinged vs sliding screens)
- Pipework and fixtures location
At this stage, the type of shower screen is finalised:
- Fixed panel
- Hinged screen
- Sliding screen
- Walk-in design
This planning step determines how the glass will be mounted and which fittings are required.
Step 2: Accurate Measurements (Critical Stage)
Glass shower screens cannot be trimmed on site, so measurements must be exact.
Measurements typically include:
- Width at top, middle, and bottom (walls are rarely perfectly straight)
- Height from tray/floor to desired screen top
- Wall angles (especially in older homes)
- Door opening clearance
Installers account for:
- Tile thickness
- Expansion gaps
- Seal tolerances
Even a few millimetres of error can cause fitment issues — this is why professional measuring is strongly recommended.
Step 3: Manufacturing the Toughened Glass
Once measurements are confirmed, the glass is manufactured.
Typical specifications:
- 6–10mm toughened safety glass
- Clear, frosted, or tinted finish
- Polished edges
- Pre-cut holes for hinges or brackets
The glass is then thermally toughened, a process that increases strength and ensures that, if broken, it shatters into small blunt fragments instead of sharp shards.
At this stage, the glass cannot be altered — accuracy earlier in the process is essential.
Step 4: Preparing the Installation Area
Before fitting begins, the bathroom must be fully prepared.
Preparation includes:
- Ensuring tiles are fully cured
- Cleaning all mounting surfaces
- Confirming tray or floor is level
- Marking fixing points with precision
If walls are tiled over plasterboard, installers may use:
- Wall anchors
- Reinforcement plates
- Structural fixing points
This prevents long-term loosening of brackets or hinges.
Step 5: Installing Wall Profiles or Brackets
Most shower screens are secured using:
- Wall channels (profiles), or
- Discrete metal brackets
This step involves:
- Drilling through tiles using specialist bits
- Fixing channels or brackets with corrosion-resistant screws
- Ensuring everything is perfectly vertical (plumb)
Accuracy here is crucial — misalignment can cause:
- Door binding
- Uneven seals
- Stress on the glass
Step 6: Positioning and Securing the Glass Panel
The glass panel is carefully lifted into place.
Key actions:
- Glass is slotted into wall channels or mounted onto brackets
- Rubber gaskets or setting blocks are used to cushion the glass
- Panels are aligned to ensure even spacing
For hinged or sliding screens:
- Hinges or rollers are attached
- Doors are tested for smooth movement
This step often requires two installers due to the weight and fragility of glass.
Step 7: Installing Doors (If Applicable)
If the design includes a door:
Hinged doors:
- Hinges are adjusted for tension
- Swing direction is tested
- Door must self-close gently without slamming
Sliding doors:
- Rollers are aligned
- Tracks are levelled
- Door overlap is adjusted to prevent leaks
Door alignment directly affects usability and lifespan.
Step 8: Sealing the Shower Screen
Once everything is aligned, sealing begins.
Sealant application:
- Clear sanitary-grade silicone is applied
- Sealing is done only on the outside edge
- Internal edges are usually left unsealed to allow drainage
This prevents:
- Water escaping onto the bathroom floor
- Moisture becoming trapped behind the glass
Sealant must cure fully before the shower is used.
Step 9: Final Adjustments & Safety Checks
Before sign-off, installers perform final checks:
- Door opens and closes smoothly
- No glass movement or flex
- All fixings are secure
- Seals sit flush against surfaces
- Glass is free from stress points
Any micro-adjustments are completed at this stage.
Step 10: Aftercare & Usage Guidance
Homeowners are advised to:
- Wait 24–48 hours before using the shower
- Avoid slamming doors
- Clean with non-abrasive products
- Use a squeegee to reduce limescale
Proper care significantly extends the lifespan of the installation.
Common Installation Mistakes (What to Avoid)
Understanding common errors helps you avoid problems:
❌ Incorrect measurements
❌ Drilling into tiles without proper bits
❌ Sealing internal edges (causes trapped water)
❌ Using standard glass instead of toughened glass
❌ Rushing door alignment
Professional installation avoids these risks.
Choosing the Right Shower Screen Design
The installation process varies slightly depending on design, but the fundamentals remain the same.
For a full overview of available designs, glass types, and configurations, this dedicated guide is helpful:
👉 glass shower screens — https://www.glasshelp.co.uk/glass-shower-screens/
Additional Guidance & Homeowner Resources
If you want deeper explanations on glass safety, bathroom applications, and buyer-focused advice, this resource provides practical, homeowner-friendly information:
👉 https://www.glasshelper.co.uk/
Final Thoughts
Glass shower screen installation is a precision process, not just a fitting job. From accurate measurement and glass manufacturing to careful alignment and sealing, every step plays a role in safety, durability, and performance.
Understanding how the process works helps you:
- Choose the right installer
- Set realistic expectations
- Ensure long-term satisfaction
When done correctly, a glass shower screen delivers clean design, reliable water control, and years of trouble-free use.