How Glass Staircases Are Installed: Step-by-Step Process Explained
Glass staircases look effortless once installed — clean lines, floating steps, and uninterrupted light. But behind that sleek finish is a highly technical installation process that demands precision, planning, and strict safety compliance.
Whether you’re a homeowner planning a modern renovation or a designer specifying glass stairs for a project, understanding how glass staircases are installed helps you make better decisions, avoid costly mistakes, and know what to expect at each stage.
This guide walks you through the entire installation process step by step, from initial measurements to final safety checks — explained in simple, practical terms.
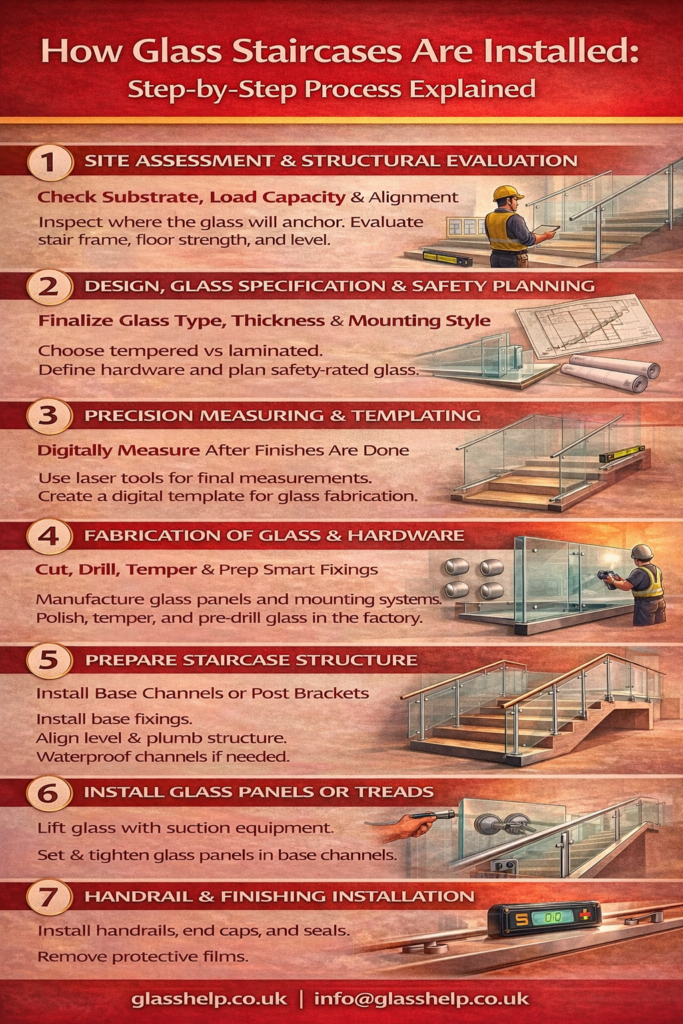
Step 1: Site Assessment & Structural Evaluation
Every successful glass staircase installation starts before any glass is ordered.
What professionals check at this stage:
- Substrate type (concrete, steel, timber)
- Load-bearing capacity of floors and stair strings
- Wall and floor alignment (glass reveals imperfections)
- Stair geometry (rise, run, angles, landings)
Glass staircases — especially frameless designs — rely heavily on what they are fixed into. If the structure isn’t sound, even the strongest glass won’t perform correctly.
This is why most installers insist on a structural review or engineer sign-off before proceeding.
Step 2: Final Design, Glass Specification & Safety Planning
Once the structure is confirmed, the exact staircase design is finalized.
Key decisions made here:
- Frameless vs framed system
- Glass type (tempered, laminated, or both)
- Glass thickness (depends on load and span)
- Finish (clear, frosted, tinted)
- Handrail type (top-mounted, side-mounted, or none)
Safety glass selection is critical at this stage. Staircases always require safety-rated glass, and laminated glass is often used where fall protection is essential.
If you’re comparing different glass options for stairs and balustrades, this guide explains how glass behaves in load-bearing applications:
👉 https://www.glasshelper.co.uk/what-type-of-glass-is-used-in-staircases/
Step 3: Precision Measuring & Digital Templating
Glass staircases allow almost zero margin for error.
After finishes like flooring and plastering are complete, installers perform final site measurements, often using:
- Digital laser measurement tools
- Physical templates for complex angles
- CAD drawings for glass fabrication
This step ensures:
- Glass panels fit exactly between floors and rails
- Fixings align perfectly with pre-drilled glass holes
- No on-site cutting is required (glass cannot be altered later)
⚠️ Skipping this step or measuring too early is one of the most common causes of delays and costly remakes.
Step 4: Fabrication of Glass & Hardware
Once measurements are approved, fabrication begins.
What happens in the factory:
- Glass is cut to size
- Edges are polished or beveled
- Glass is tempered and/or laminated
- Holes and notches are pre-drilled
- Surface finishes (frosted, tinted) are applied
At the same time, mounting systems are prepared:
- Base channels
- Clamps or spigots
- Handrails
- Gaskets and setting blocks
This stage typically takes 2–4 weeks, depending on complexity.
Step 5: Preparing the Staircase for Installation
Before glass arrives on site, installers prepare the staircase structure.
This includes:
- Installing base channels or post brackets
- Verifying level and plumb alignment
- Setting expansion gaps where required
- Waterproofing channels (especially near bathrooms or exterior stairs)
For frameless systems, base channels must be perfectly level — even a few millimeters off can cause visible glass lean.
Step 6: Installing Glass Panels or Treads
This is the most delicate and visually critical stage.
How glass is installed:
- Panels are lifted using glass suction equipment
- Glass is seated on setting blocks (never directly on metal)
- Panels are temporarily braced and aligned
- Gaskets and pressure plates are fitted
- Fixings are tightened in a controlled sequence
For staircases with glass balustrades, installation usually proceeds:
- Lower flight
- Landings
- Upper flight
For glass treads (less common but premium):
- Laminated glass steps are installed individually
- Anti-slip treatments are verified
- Load distribution is carefully checked
Step 7: Handrail & Finishing Installation
Once glass is secure, finishing elements are added.
Common finishing steps:
- Installing top handrails (wood, stainless steel, aluminum)
- Adding end caps and trims
- Cleaning protective films
- Sealing joints if required
Handrails are not just decorative — in many regions they are legally required for stair safety, even when glass is used.
Step 8: Safety Checks, Load Testing & Compliance
Before sign-off, installers perform final safety checks.
Typical checks include:
- Verifying glass alignment and fixings
- Checking handrail height and continuity
- Confirming no glass-to-glass contact
- Ensuring there are no chips or edge damage
- Confirming compliance with local building codes
In high-end or commercial projects, load testing may be conducted to verify performance.
If you want to understand how compliant glass stair systems are designed and installed, this overview is helpful:
👉 https://www.glasshelp.co.uk/glass-staircase/
Step 9: Final Cleaning & Handover
After installation:
- Glass is professionally cleaned
- Installation documentation is provided
- Care and maintenance guidance is shared
Good installers will also explain:
- How to clean glass safely
- What products to avoid
- How often fixings should be inspected
How Long Does Glass Staircase Installation Take?
| Stage | Typical Time |
|---|---|
| Design & approval | 1–2 weeks |
| Fabrication | 2–4 weeks |
| On-site installation | 1–3 days |
| Final checks | Same day |
Complex staircases or multi-level installations may take longer.
Common Installation Mistakes to Avoid
- Measuring before finishes are complete
- Ignoring substrate strength
- Using non-laminated glass where fall protection is needed
- Poor drainage in base channels
- Choosing installers without glass-specific experience
Glass staircases are not a DIY project — even small errors can compromise safety or appearance.
How Glass Staircases Compare to Traditional Installations
Compared to timber or steel stairs, glass installations require:
- Higher precision
- Cleaner site conditions
- Better coordination between trades
- Longer planning but less ongoing maintenance
Final Thoughts
A glass staircase may look simple, but its installation is anything but.
From structural checks and precision measuring to careful glass handling and safety verification, every step matters. When installed correctly, glass staircases offer exceptional durability, safety, and visual impact — often outperforming traditional materials in modern homes.